This tutorial starts with a simple content app that does not use Branch. The main view shows a list of the planets. Select any row in the list to see the Wikipedia page for that planet in a web view with a Share button. The Share button is initially unimplemented.


In the course of the tutorial, you will add the react-native-branch SDK to
this app and implement sharing and deep link routing using Branch. The finished
product will be essentially the same as the complete webview_example in this
repo.
Make sure your app is set up in the Branch Dashboard. From the Dashboard, you need:
- Your Branch live and test keys
- The domains used with these keys
- The bundle identifier associated with your app in the Dashboard (iOS only)
Run yarn first to supply all dependencies in node_modules.
Several dependencies of this app (react-native-screens
and react-native-gesture-handler) had not been updated to AndroidX when last
checked. It is necessary manually to convert them to AndroidX using the tools
in AndroidStudio. Alternately, after using yarn or npm to install the contents
of node_modules, you can run
cp -r ../androidx-deps/* node_modulesThis will copy updated Java source for the versions in the yarn.lock into the build tree so that an Android build will succeed.
-
Add the react-native-branch SDK.
Using yarn
yarn add react-native-branch
This installs the latest release from NPM. To use the SDK from this local repo instead of NPM:
yarn add ../..
Using NPM
npm install --save react-native-branch
Note that using
npm install --save ../..causes problems with both iOS and Android.
-
Run
pod installat the command line in theiossubdirectory. This step regenerates the code in thePodssubdirectory. Note: This repo includes a Gemfile. It is necessary first tobundle check || bundle installand then usebundle execwith any pod command. Depending on your app configuration, you may just runpod install. The--repo-updateoption is equivalent to runningpod repo update; pod install. This may be necessary to get the required version of the Branch SDK. If your podspec repo is up to date, you may omit this option, which takes more time.cd ios bundle check || bundle install bundle exec pod install --repo-update
-
Open the
ios/webview_tutorial.xcworkspaceusing Xcode. Select the AppDelegate.m file from the left panel. Alternately, openios/webview_tutorial/AppDelegate.min your favorite editor. At the top of the file, add:#import <RNBranch/RNBranch.h>
-
Find the
application:didFinishLaunchingWithOptions:method near the top of the AppDelegate.m file. Add the following to the beginning of that method:#ifdef DEBUG [RNBranch useTestInstance]; #endif // DEBUG [RNBranch initSessionWithLaunchOptions:launchOptions isReferrable:YES];
-
Add the following method before the final
@endin the AppDelegate.m file:- (BOOL)application:(UIApplication *)app openURL:(NSURL *)url options:(NSDictionary<UIApplicationOpenURLOptionsKey,id> *)options { return [RNBranch.branch application:app openURL:url options:options] || [[UIApplication sharedApplication] openURL:url]; } - (BOOL)application:(UIApplication *)app continueUserActivity:(nonnull NSUserActivity *)userActivity restorationHandler:(nonnull void (^)(NSArray * _Nullable))restorationHandler { return [RNBranch.branch continueUserActivity:userActivity]; }
The complete AppDelegate should look like this:
#import "AppDelegate.h"

#import <React/RCTBundleURLProvider.h>
#import <React/RCTRootView.h>

#if RCT_DEV
#import <React/RCTDevLoadingView.h>
#endif

// Step 2: Add RNBranch import

#import <RNBranch/RNBranch.h>

@implementation AppDelegate

- (BOOL)application:(UIApplication *)application didFinishLaunchingWithOptions:(NSDictionary *)launchOptions
{
  // Step 3: Add call to [RNBranch initSessionWithLaunchOptions:isReferrable:]
#ifdef DEBUG
  [RNBranch useTestInstance];
#endif // DEBUG
  [RNBranch initSessionWithLaunchOptions:launchOptions isReferrable:YES];

  RCTBridge *bridge = [[RCTBridge alloc] initWithDelegate:self launchOptions:launchOptions];

#if RCT_DEV
  [bridge moduleForClass:RCTDevLoadingView.class];
#endif

  RCTRootView *rootView = [[RCTRootView alloc] initWithBridge:bridge moduleName:@"webview_tutorial" initialProperties:nil];
  rootView.backgroundColor = [[UIColor alloc] initWithRed:1.0f green:1.0f blue:1.0f alpha:1];

  self.window = [[UIWindow alloc] initWithFrame:[UIScreen mainScreen].bounds];
  UIViewController *rootViewController = [UIViewController new];
  rootViewController.view = rootView;
  self.window.rootViewController = rootViewController;
  [self.window makeKeyAndVisible];
  return YES;
}

- (NSURL *)sourceURLForBridge:(RCTBridge *)bridge
{
#if DEBUG
  return [[RCTBundleURLProvider sharedSettings] jsBundleURLForBundleRoot:@"index" fallbackResource:nil];
#else
  return [[NSBundle mainBundle] URLForResource:@"main" withExtension:@"jsbundle"];
#endif
}

// Step 4: Add application:openURL:options: and application:continueUserActivity:restorationHandler: methods

- (BOOL)application:(UIApplication *)app openURL:(NSURL *)url options:(NSDictionary<UIApplicationOpenURLOptionsKey,id> *)options
{
  return [RNBranch.branch application:app openURL:url options:options] || [[UIApplication sharedApplication] openURL:url];
}

- (BOOL)application:(UIApplication *)app continueUserActivity:(nonnull NSUserActivity *)userActivity restorationHandler:(nonnull void (^)(NSArray * _Nullable))restorationHandler
{
  return [RNBranch.branch continueUserActivity:userActivity];
}

@end
-
In Xcode, change the bundle identifier to the correct bundle identifier for your Branch app (see the Branch Dashboard). Also change the code signing settings to use your signing team.
-
In Xcode, add your Branch keys to the Info.plist as a dictionary.

-
In Xcode, add your Branch domains to the application's associated domains. Be sure to prefix each domain with
applinks:. -
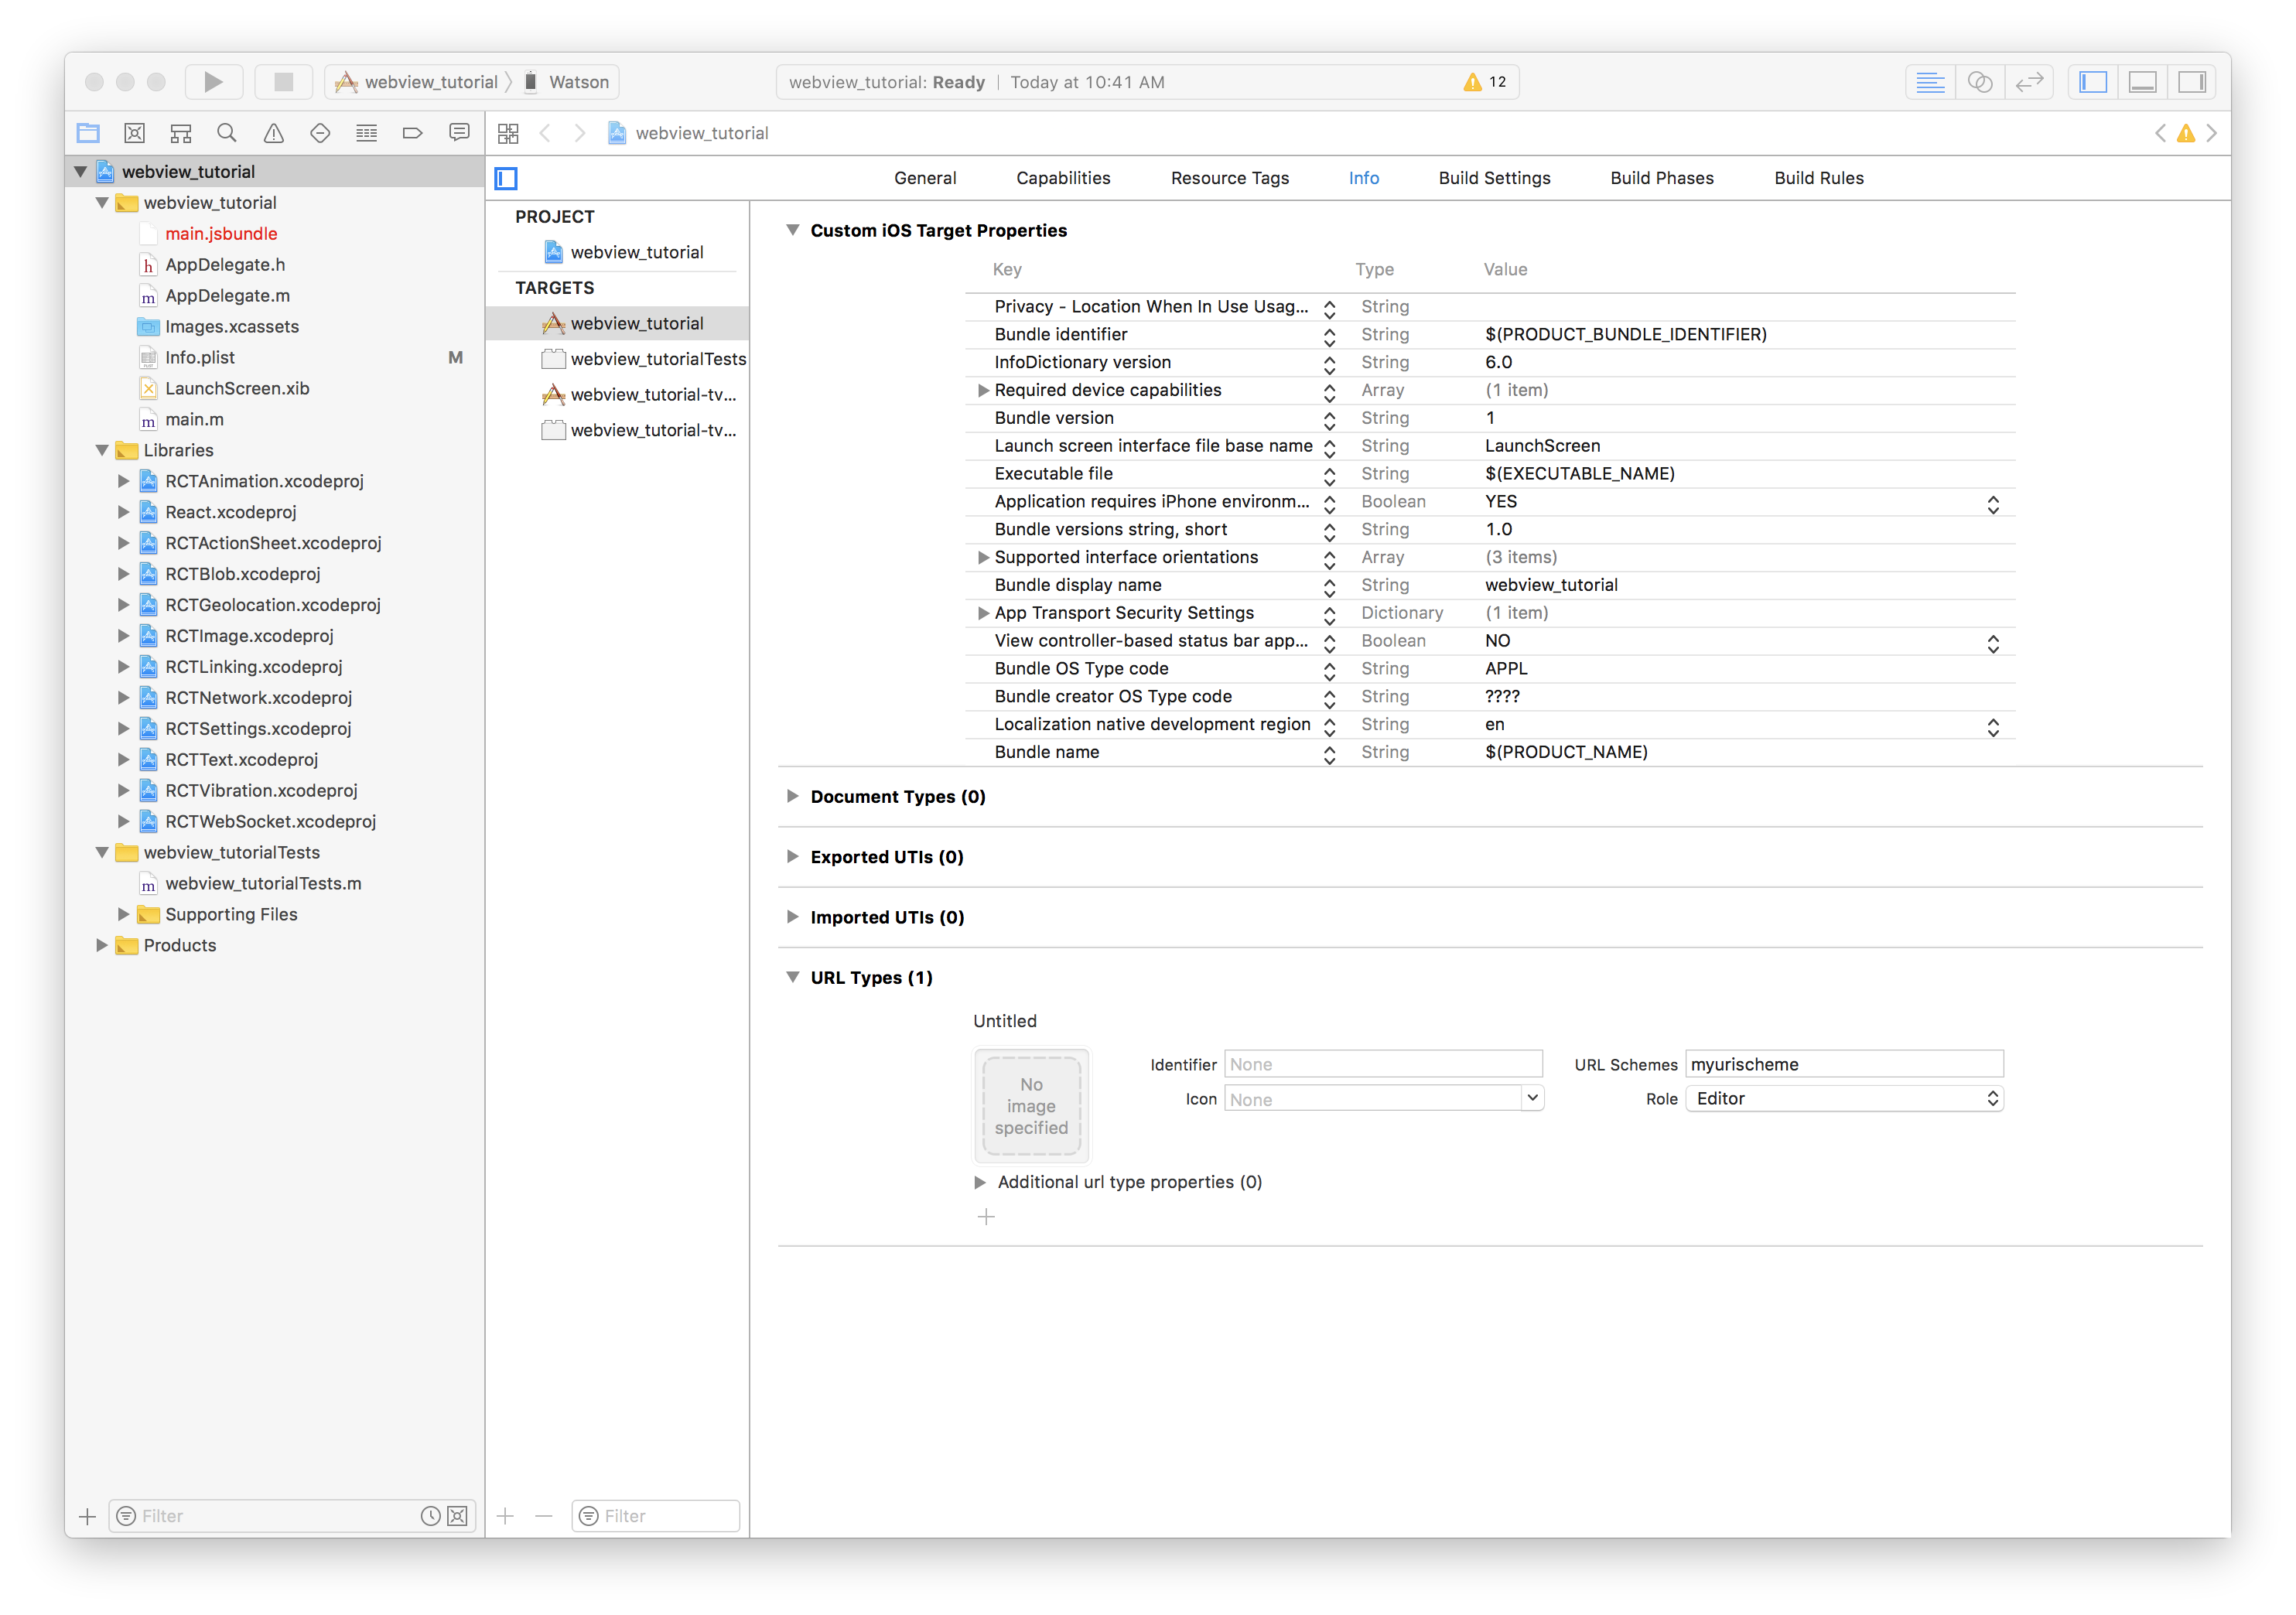
If using a custom URI scheme in the Branch Dashboard, add that URI scheme to the app's Info.plist.


-
Open the
androidproject in Android Studio. Open theMainApplication.javafile in Android Studio. Alternately, openandroid/app/src/main/java/com/webview_tutorial/MainApplication.javain your favorite text editor. At the top of the file, after thepackagedeclaration, add the following line:import io.branch.rnbranch.RNBranchModule;
-
In the
onCreatemethod, add the following line:RNBranchModule.getAutoInstance(this);
The complete MainApplication should look like this:
package com.webview_tutorial;

// Step 1: Add RNBranchModule import
import io.branch.rnbranch.RNBranchModule;

import android.app.Application;

import com.facebook.react.ReactApplication;
import com.facebook.react.ReactNativeHost;
import com.facebook.react.ReactPackage;
import com.facebook.react.PackageList;
import com.facebook.soloader.SoLoader;

import java.util.List;

public class MainApplication extends Application implements ReactApplication {

  private final ReactNativeHost mReactNativeHost = new ReactNativeHost(this) {
    @Override
    public boolean getUseDeveloperSupport() {
      return BuildConfig.DEBUG;
    }

    @Override
    protected List<ReactPackage> getPackages() {
      return new PackageList(this).getPackages();
    }

    @Override
    protected String getJSMainModuleName() {
      return "index";
    }
  };

  @Override
  public ReactNativeHost getReactNativeHost() {
    return mReactNativeHost;
  }

  @Override
  public void onCreate() {
    super.onCreate();
    SoLoader.init(this, /* native exopackage */ false);

    // Step 2: Add call to RNBranch.getAutoInstance
    RNBranchModule.getAutoInstance(this);
  }
}
-
Open the
android/app/src/main/java/com/webview_tutorial/MainActivity.javafile in Android Studio or your favorite editor. Add the following imports near the top of the file:import io.branch.rnbranch.RNBranchModule; import android.content.Intent;
-
Add the
onStartmethod in the MainActivity:@Override protected void onStart() { super.onStart(); RNBranchModule.initSession(getIntent().getData(), this); }
-
Add the
onNewIntentmethod in the MainActivity:@Override public void onNewIntent(Intent intent) { super.onNewIntent(intent); setIntent(intent); }
The complete MainActivity should look like this:
package com.webview_tutorial;

// Step 3: Import RNBranchModule and Android Intent class
import io.branch.rnbranch.RNBranchModule;
import android.content.Intent;

import com.facebook.react.ReactActivity;
import com.facebook.react.ReactActivityDelegate;
import com.facebook.react.ReactRootView;
import com.swmansion.gesturehandler.react.RNGestureHandlerEnabledRootView;

public class MainActivity extends ReactActivity {

    /**
     * Returns the name of the main component registered from JavaScript.
     * This is used to schedule rendering of the component.
     */
    @Override
    protected String getMainComponentName() {
        return "webview_tutorial";
    }

    @Override
    protected ReactActivityDelegate createReactActivityDelegate() {
        return new ReactActivityDelegate(this, getMainComponentName()) {
            @Override
            protected ReactRootView createRootView() {
                return new RNGestureHandlerEnabledRootView(MainActivity.this);
            }
        };
    }

    // Step 4: Add onStart method
    @Override
    protected void onStart() {
        super.onStart();
        RNBranchModule.initSession(getIntent().getData(), this);
    }

    // Step 5: Add onNewIntent method
    @Override
    public void onNewIntent(Intent intent) {
        super.onNewIntent(intent);
        setIntent(intent);
    }

}
-
Open the
android/app/src/main/AndroidManifest.xmlin Android Studio or a text editor. Addandroid:launchMode="singleTask"to the MainActivity:<activity android:name=".MainActivity" android:label="@string/app_name" android:configChanges="keyboard|keyboardHidden|orientation|screenSize" android:windowSoftInputMode="adjustResize" android:launchMode="singleTask">
-
Add
intent-filtersto the MainActivity in the Android manifest using your Branch domains:<intent-filter android:autoVerify="true"> <action android:name="android.intent.action.VIEW"/> <category android:name="android.intent.category.DEFAULT"/> <category android:name="android.intent.category.BROWSABLE"/> <data android:scheme="https" android:host="yourapp.app.link"/> <data android:scheme="https" android:host="yourapp-alternate.app.link"/> <data android:scheme="https" android:host="yourapp.test-app.link"/> <data android:scheme="https" android:host="yourapp-alternate.test-app.link"/> </intent-filter>
Replace
yourappin the example above with yourapp.linksubdomain from the Branch portal.If using a custom URI scheme in the Branch Dashboard, also add an
intent-filterfor that URI scheme.<intent-filter> <action android:name="android.intent.action.VIEW"/> <category android:name="android.intent.category.DEFAULT"/> <category android:name="android.intent.category.BROWSABLE"/> <data android:scheme="myurischeme" android:host="open"/> </intent-filter>
Replace
myurischemewith your actual URI scheme. -
Add your Branch keys to the Android manifest at the end of the application element.
<!-- Branch keys -->
<meta-data android:name="io.branch.sdk.BranchKey" android:value="key_live_xxxx"/>
<meta-data android:name="io.branch.sdk.BranchKey.test" android:value="key_test_yyyy"/>
Replace
key_live_xxxxandkey_test_yyyywith your Branch live and test keys from the Branch Dashboard.The complete main manifest should look like this:
<manifest xmlns:android="http://schemas.android.com/apk/res/android"
     package="com.webview_tutorial"
     android:versionCode="1"
     android:versionName="1.0">

     <uses-permission android:name="android.permission.INTERNET" />
     <uses-permission android:name="android.permission.SYSTEM_ALERT_WINDOW"/>

     <uses-sdk
         android:minSdkVersion="16"
         android:targetSdkVersion="22" />

     <application
         android:name=".MainApplication"
         android:allowBackup="true"
         android:label="@string/app_name"
         android:icon="@mipmap/ic_launcher"
         android:theme="@style/AppTheme"
         android:launchMode="singleTask">
         <!-- Step 6: Add singleTask to the MainActivity above -->
         <activity
             android:name=".MainActivity"
             android:label="@string/app_name"
             android:configChanges="keyboard|keyboardHidden|orientation|screenSize"
             android:windowSoftInputMode="adjustResize">
             <intent-filter>
                 <action android:name="android.intent.action.MAIN" />
                 <category android:name="android.intent.category.LAUNCHER" />
             </intent-filter>
             <!-- Step 7: Add intent-filters -->
             <intent-filter android:autoVerify="true">
                 <action android:name="android.intent.action.VIEW"/>
                 <category android:name="android.intent.category.DEFAULT"/>
                 <category android:name="android.intent.category.BROWSABLE"/>
                 <data android:scheme="https" android:host="yourapp.app.link"/>
                 <data android:scheme="https" android:host="yourapp-alternate.app.link"/>
                 <data android:scheme="https" android:host="yourapp.test-app.link"/>
                 <data android:scheme="https" android:host="yourapp-alternate.test-app.link"/>
             </intent-filter>
             <intent-filter>
                 <action android:name="android.intent.action.VIEW"/>
                 <category android:name="android.intent.category.DEFAULT"/>
                 <category android:name="android.intent.category.BROWSABLE"/>
                 <data android:scheme="myurischeme" android:host="open"/>
             </intent-filter>
         </activity>
         <activity android:name="com.facebook.react.devsupport.DevSettingsActivity" />
         <!-- Step 8: Add Branch keys -->
         <!-- Branch keys -->
         <meta-data android:name="io.branch.sdk.BranchKey" android:value="key_live_xxxx"/>
         <meta-data android:name="io.branch.sdk.BranchKey.test" android:value="key_test_yyyy"/>
     </application>

</manifest>
-
Add a file called
android/app/src/debug/AndroidManifest.xmlwith the following contents:<manifest xmlns:android="http://schemas.android.com/apk/res/android" package="com.webview_tutorial"> <application> <meta-data android:name="io.branch.sdk.TestMode" android:value="true" /> <!-- Set to true to use Branch_Test_Key --> </application> </manifest>
-
Open the file
android/app/proguard-rules.proand add the following line at the end:-dontwarn io.branch.**
-
Open the file
src/ArticleList.js. Add the following line to import the react-native-branch SDK:import branch from 'react-native-branch'
-
Add a property to the ArticleList class called
_unsubscribeFromBranch. Initialize it to null:_unsubscribeFromBranch = null
-
Add a
componentDidMountmethod to the ArticleList class:componentDidMount() { this._unsubscribeFromBranch = branch.subscribe(({ error, params }) => { if (error) { console.error("Error from Branch: " + error) return } console.log("Branch params: " + JSON.stringify(params)) if (!params['+clicked_branch_link']) return // Get title and url for route let title = params.$og_title let url = params.$canonical_url let image = params.$og_image_url // Now push the view for this URL this.props.navigation.navigate('Article', {url: url, title: title, image: image}) }) }
-
Add a
componentWillUnmountmethod to the ArticleList class:componentWillUnmount() { if (this._unsubscribeFromBranch) { this._unsubscribeFromBranch() this._unsubscribeFromBranch = null } }
The complete ArticleList class should look like this:
import React, { Component } from 'react'
import { Text, Image, FlatList, StyleSheet, TouchableHighlight, View } from 'react-native'

// Step 1: import Branch
import branch from 'react-native-branch'

import Article from './Article'

class ArticleList extends Component {
  static navigationOptions = {
    title: 'The Planets',
  }

  // Step 2: Add _unsubscribeFromBranch property
  _unsubscribeFromBranch = null

  constructor(props) {
    super(props)

    this.state = {
      listData: props.listData || [
        { title: 'Mercury', url: 'https://en.wikipedia.org/wiki/Mercury_(planet)', image: 'https://upload.wikimedia.org/wikipedia/commons/d/d9/Mercury_in_color_-_Prockter07-edit1.jpg' },
        { title: 'Venus', url: 'https://en.wikipedia.org/wiki/Venus', image: 'https://upload.wikimedia.org/wikipedia/commons/e/e5/Venus-real_color.jpg' },
        { title: 'Earth', url: 'https://en.wikipedia.org/wiki/Earth', image: 'https://upload.wikimedia.org/wikipedia/commons/9/97/The_Earth_seen_from_Apollo_17.jpg' },
        { title: 'Mars', url: 'https://en.wikipedia.org/wiki/Mars', image: 'https://upload.wikimedia.org/wikipedia/commons/0/02/OSIRIS_Mars_true_color.jpg' },
        { title: 'Jupiter', url: 'https://en.wikipedia.org/wiki/Jupiter', image: 'https://upload.wikimedia.org/wikipedia/commons/2/2b/Jupiter_and_its_shrunken_Great_Red_Spot.jpg' },
        { title: 'Saturn', url: 'https://en.wikipedia.org/wiki/Saturn', image: 'https://upload.wikimedia.org/wikipedia/commons/c/c0/Saturn-27-03-04.jpeg' },
        { title: 'Uranus', url: 'https://en.wikipedia.org/wiki/Uranus', image: 'https://upload.wikimedia.org/wikipedia/commons/3/3d/Uranus2.jpg' },
        { title: 'Neptune', url: 'https://en.wikipedia.org/wiki/Neptune', image: 'https://upload.wikimedia.org/wikipedia/commons/5/56/Neptune_Full.jpg' },
        { title: 'Pluto', url: 'https://en.wikipedia.org/wiki/Pluto', image: 'https://upload.wikimedia.org/wikipedia/commons/2/2a/Nh-pluto-in-true-color_2x_JPEG-edit-frame.jpg' },
      ],
    }
  }

  // Step 3: Add componentDidMount
  componentDidMount() {
    this._unsubscribeFromBranch = branch.subscribe(({ error, params }) => {
      if (error) {
        console.error("Error from Branch: " + error)
        return
      }

      console.log("Branch params: " + JSON.stringify(params))

      if (!params['+clicked_branch_link']) return

      // Get title and url for route
      let title = params.$og_title
      let url = params.$canonical_url
      let image = params.$og_image_url

      // Now push the view for this URL
      this.props.navigation.navigate('Article', {url: url, title: title, image: image})
    })
  }

  // Step 4: Add componentWillUnmount
  componentWillUnmount() {
    if (this._unsubscribeFromBranch) {
      this._unsubscribeFromBranch()
      this._unsubscribeFromBranch = null
    }
  }

  render() {
    return (
      <View style={styles.container}>
        <FlatList
          data={this.state.listData}
          keyExtractor={(item, index) => index.toString()}
          renderItem={({item}) =>
            <TouchableHighlight
              onPress={() => { this._showArticle(item) }}>
              <View style={styles.item}>
                <Image
                  style={styles.image}
                  source={{uri: item.image}}/>
                <Text
                  style={styles.label}>
                  {item.title}
                </Text>
              </View>
            </TouchableHighlight>}
        />
      </View>
    )
  }

  _showArticle(data) {
    console.log("Show article with URL " + data.url)
    this.props.navigation.navigate('Article', data)
  }
}

const styles = StyleSheet.create({
  container: {
    flex: 1,
    justifyContent: 'center',
    marginTop: 0,
  },
  item: {
    height: 88,
    flex: 1,
    flexDirection: 'row',
    alignItems: 'center',
  },
  image: {
    width: 80,
    height: 80,
    marginLeft: 8
  },
  label: {
    fontWeight: 'bold',
    fontSize: 17,
    margin: 20,
  },
})

export default ArticleList
-
Open the
src/Article.jsclass. Import thebranchinstance and theBranchEventclass.import branch, { BranchEvent } from 'react-native-branch'
-
Add a
buoproperty to the Article class and initialize it to null;buo = null
-
Create a Branch Universal Object in the
componentDidMountmethod and register a view event. Add the following method to the Article class:async componentDidMount() { this.buo = await branch.createBranchUniversalObject("planet/" + this.props.navigation.state.params.title, { locallyIndex: true, canonicalUrl: this.props.navigation.state.params.url, title: this.props.navigation.state.params.title, contentImageUrl: this.props.navigation.state.params.image }) this.buo.logEvent(BranchEvent.ViewItem) console.log("Created Branch Universal Object and logged standard view item event.") }
-
Add a
componentWillUnmountmethod with a call tothis.buo.release().componentWillUnmount() { if (!this.buo) return this.buo.release() this.buo = null }
-
Implement the
onSharemethod to show the Branch share sheet. Add the following as the body of the onShare method:let { channel, completed, error } = await this.buo.showShareSheet({ emailSubject: "The Planet " + this.props.navigation.state.params.title, messageBody: "Read about the planet " + this.props.navigation.state.params.title + ".", messageHeader: "The Planet " + this.props.navigation.state.params.title }, { feature: "share", channel: "RNApp" }, { $desktop_url: this.props.navigation.state.params.url, $ios_deepview: "branch_default" }) if (error) { console.error("Error sharing via Branch: " + error) return } console.log("Share to " + channel + " completed: " + completed)
The complete Article class should look like this:
import React, { Component } from 'react'
import { StyleSheet, Text, TouchableHighlight, View } from 'react-native'
import { WebView } from 'react-native-webview'

// Step 5: Import branch and BranchEvent
import branch, { BranchEvent } from 'react-native-branch'

const styles = StyleSheet.create({
  container: {
    flex: 1,
    flexDirection: 'column'
  },
  webView: {
  },
  button: {
    backgroundColor: '#cceeee',
    borderColor: '#2266aa',
    borderTopWidth: 1,
    flex: 0.15,
    justifyContent: 'center'
  },
  buttonText: {
    color: '#2266aa',
    fontSize: 23,
    fontWeight: 'bold',
    textAlign: 'center'
  }
})

export default class Article extends Component {
  static navigationOptions = ({navigation}) => ({
    title: navigation.getParam('title', 'Article')
  })

  // Step 6: Add buo property
  buo = null

  // Step 7: Add componentDidMount
  async componentDidMount() {
    this.buo = await branch.createBranchUniversalObject("planet/" + this.props.navigation.state.params.title, {
      locallyIndex: true,
      canonicalUrl: this.props.navigation.state.params.url,
      title: this.props.navigation.state.params.title,
      contentImageUrl: this.props.navigation.state.params.image
    })
    this.buo.logEvent(BranchEvent.ViewItem)
    console.log("Created Branch Universal Object and logged standard view item event.")
  }

  // Step 8: Add componentWillUnmount
  componentWillUnmount() {
    if (!this.buo) return
    this.buo.release()
    this.buo = null
  }

  render() {
    return (
      <View
        style={styles.container} >
        <WebView
          style={styles.webView}
          source={{uri: this.props.navigation.state.params.url}} />
        <TouchableHighlight
          onPress={() => this.onShare()}
          style={styles.button} >
          <Text
            style={styles.buttonText}>
            Share
          </Text>
        </TouchableHighlight>
      </View>
    )
  }

  async onShare() {
    // Step 9: Implement onShare
    let { channel, completed, error } = await this.buo.showShareSheet({
      emailSubject: "The Planet " + this.props.navigation.state.params.title,
      messageBody: "Read about the planet " + this.props.navigation.state.params.title + ".",
      messageHeader: "The Planet " + this.props.navigation.state.params.title
    }, {
      feature: "share",
      channel: "RNApp"
    }, {
      $desktop_url: this.props.navigation.state.params.url,
      $ios_deepview: "branch_default"
    })

    if (error) {
      console.error("Error sharing via Branch: " + error)
      return
    }

    console.log("Share to " + channel + " completed: " + completed)
  }
}
The app now includes a complete Branch integration. Try it out with
react-native run-androidor
react-native run-iosor just open the projects in Android Studio or Xcode, build and run.
Select any article and then press the Share button. Use it to share the content in any way you like, e.g. mail yourself a link or copy it and paste it into the Notes app. Open any link generated in the app. The app will be launched, and the appropriate content will be displayed.
The following are not included yet in this tutorial.
- Setting up custom Branch domains or non-Branch domains
- Handling non-Branch domains
- Using a single Branch key