I run Arch Linux on my laptop, and have experience with Ubuntu as well. For the purposes of this class, I have installed Windows 10 Education Edition (available free to U of T students here). I wil also attempt to support MacOS as best I can.
- if you have an earlier edition of Windows, some of our tools may not work properly. I encourage you to upgrade to Windows 10 Education Edition, which has good support for modern tools.
- if you have a Chromebook, you will need to install a full Linux OS in order to do the coursework. Gallium OS and Crouton are the two recommended tools for this, and you can find some instructions here. Newer Chromebooks may support the new Linux Apps Beta installation, but I can’t test them. In the bast, Linux on a chromebook has not been easy, and I won’t be able to help you. If this seems hard, you may want to think about buying an inexpensive, older laptop and installing an ordinary Linux distribution. Here are two lists of distributions, but the choice is up to you. .
Here’s the table of tools from the syllabus:
| Tool | On Mac | On Windows | On Linux |
|---|---|---|---|
| Real Web Browser | Firefox and/or Chrome | Firefox and/or Chrome | Firefox and/or Chrome |
| Text Editor | VSCode | VSCode | VSCode |
| Bash Shell Environment | Terminal (Built in) | Git for Windows or Windows Subsystem for Linux | gnome-terminal, qterm, etc |
| Git Version Control | Git for OSX | Git for Windows | apt-get install git |
| Slack Community | Client Download, Signup Link | Client Download, Signup Link | Client Download, Signup Link |
| Github Org Membership | Sign up here | Sign up here | Sign up here |
| Node and NPM | Node Website (guide) | Node Website (guide) | Node Website (distro instructions) |
If you’re comfortable exploring and installing software, you can probably get set up quickly by following the links above. Please nonetheless read the detailed instructions below. Things will go smoother if you do!
All of our work will involve interacting with the World Wide Web. Firefox and Chrome are head and shoulders above all other web browsers, and you should install one (or preferably both) of them. In class, I will use Firefox almost exclusively. If you haven’t tried Firefox for a while, give the new Quantum version a try’ it is much, much faster and more stable than its predecessors.
Both have highly sophisticated developer tools with which you should familiarize yourself. As you learn more about web design, you’ll come to rely on these tools more and more. Follow these links for more about Firefox Dev Tools and Chrome’s version.
Of particular value in both Chrome and Firefox is the “Javascript Consoles,” accessible from the developer tools: Tools \rightarrow Web Developer \rightarrow Console or Menu \rightarrow More Tools \rightarrow Developer \rightarrow Console
The Firefox console is a little awkward to use for multi-line programming, so they have also provided a “Scratchpad” tool (Shift-F4), which I find helpful, though I now use VSCode’s Javascript console instead (see “Text Editor”, below).
The other tool I use all the time is “inspect element”, available by right-clicking on any part of a web page. Both of these tools will prove essential for figuring out why your code isn’t working right!
If you want to code, you have to write like a coder. This means using a powerful text editor. In this class we use Visual Studio Code. Please follow the download links and install to your computer. There’s a separate post about using VSCode – once you’ve installed it, navigate there!
Web developers and digital humanists spend a lot of their time in the command-line environment, interacting with their computers through text-based commands instead of a mouse or voice interface. It takes some time to learn to use the command-line, but it’s a very powerful and effective way to work once you get used to it. One goal of this course is to help you get comfortable in this environment and learn to take advantage of its power.
There are actually many different command-line environments; in this class we use bash, the most popular.
On Mac and Linux, bash is built in to the system. In Mac, open the Terminal app to find the bash prompt; in Linux you may have any of several terminal emulators installed, search your program list for “term” to find yours.
In Windows, bash comes with the Git installation – follow the instructions below. Note that very recent editions of Windows 10 come with the “Windows Subsystem for Linux (WSL)”, which you can use instead of the Git Bash method.
IMPORTANT UPDATE: VSCode has an integrated terminal, and it’s extremely useful. Windows users will have to do a little bit of work in order to use bash in the integrated terminal. See the excellent terminal configuration instructions online, and be sure to follow the link explaining how to access the user settings screen in VSCode.
Software development is made vastly easier by ”version control” systems: specialized software that keeps track of the history and current state of files and directories. In the past there were many such systems, but now almost the whole user uses git, and we’re all grateful for it.To install git, follow the download links on the website (see the table above for OS-specific links and instructions). We’ll come back to the Git command-line in a minute.
For many developers – maybe even most of them – using Git is intimately tied to the Github code-sharing website. We’ll be using Github for almost all of our work this semester, so it’s important that you get familiar with it. If you were present for the first class, you’ve already done this. If not, you’ll need to sign Up for a Github account. Once you’ve done that, you have two choices:
- practice working at the command line
- go straight to a GUI (“Graphical User Interface”) that will make working with git a little more comfortable.
I recommend at least trying the command line first.
You need to tell git a little bit about yourself. Start with your email address and your user name. Open your bash shell (Terminal in Mac, git-bash in Windows) and type:
git config --global user.name "Your Name"
git config --global user.email "youraddress@ mail.utoronto.ca"
git config --global github.user YourGithubId
Great – now git knows who you are. If you’re feeling ambitious, you can also set up SSH keys so you don’t have to type in your password every time you commit to Git.
VSCode also has an interface to Git and Github. It’s pretty powerful and intuitive, so I recommend trying it before installing GitKraken. The instructions are here.
Sometimes it’s nice to have a backp. GitKraken is an impressive visual tool that also makes it easy to configure all of your information. They have a nice video about SSH integration, which you can watch if you like.
There is a somewhat more wordy Git tutorial on this website, which you should read. For now, Install the Github Desktop App which also includes the command-line version of git. You can follow the excellent tutorial in the downloadable git-it application, as well as the Github Desktop documentation. There is also a quite helpful tutorial on The Programming Historian. We’ll be discussing Git and Github further in our first class.
Right now it looks like the drag and drop tool we wanted to make will NOT be ready for this semester
Installing Node is not strictly necessary for the first assignment. If you are having trouble, put this off till next week.
Most of our programming work will involve Javascript, which runs most of the web. The Node.js environment and its “package manager,” NPM, are an incredible resource for Javascript development. In fact, Slack, VSCode, and gitKraken are all written as Node applications themselves! Installing the “bare” versions of node and NPM lets us access some of that power while we work.
You can survive this class without installing Node, but without it, you won’t be able to run the test suites that accompany all of the assignments. You’ll therefore be at a disadvantage in the class, because the tests offer hints about what’s wrong with your code.
- In Mac and Linux, the instructions linked to in the table above are probably good enough.
- In Windows, you may follow all the instructions and then find yourself getting an error (”
Command not found”). If that happens, you may want to try the instructions laid out here, or if you’re on Windows 10, you could go crazy and install the amazing Windows Subsystem for Linux, which allows you to work as if your computer had a real Unix operating system like everyone else.
The details of Node and NPM are a little outside the scope of our class, but a colleague at the University of Washington has an excellent introduction in one of his courses.
Slack is not strictly necessary to do your work, but it is the principal means of conversation for the class. Your activity in our Slack team is part of your participation assessment. So, please sign up for the team using the signup links above, and if you’re not familiar with Slack already, read some of the Slack documentation.
Microsoft’s Visual Studio Code is an amazing general-purpose code editor. Most people I collaborate with use it as their primary editor, and that will be true in most professional settings you enter. This is the first year we’re using it in the class, and I have some high hopes for it.
As with any powerful tool, it can take a little while to get comfortable with VSCode. The documentation is excellent, but may sometimes assume more advanced programming skills than you have. The videos are also excellent and recommended.
I will mostly let you explore on your own, but here are a few important starting points.
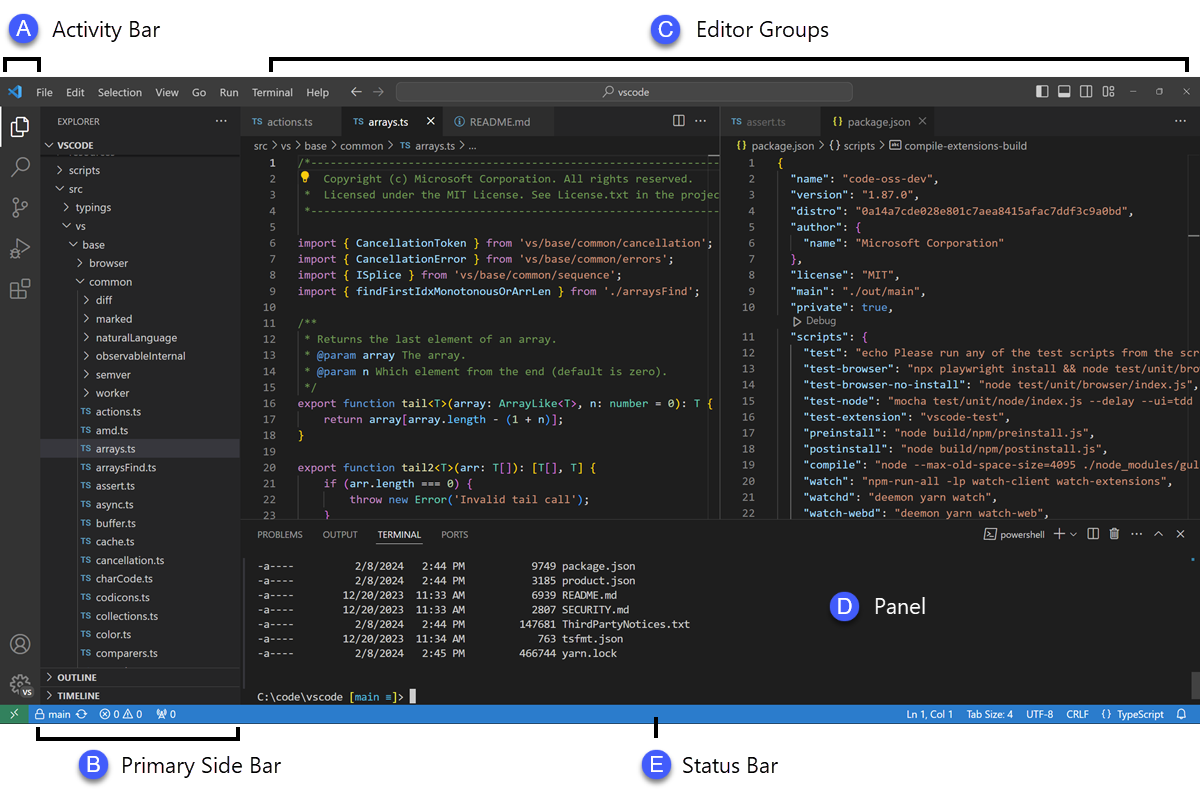
The editor has 4 main parts. Since each part can itself have lots of parts, this is not as simple as it sounds! From left to right, here are the main areas:
- the activity bar provides you with various tools and ways to switch views
- the side bar content changes depending on what you’ve selected in the activity bar. By default, it shows a file tree listing, like you would find in windows explorer or the Apple Finder. But it can also provide a list of extensions, information about your git status, or information about project tests, among other things.
- the editor groups are clusters of tabs. Usually a tab will contain a file, but things like the VSCode preferences and live HTML previews also show up in this area
- the panels near the bottom include the built-in terminal, a list of errors VSCode has found in your files, and other important tools
Also, the blue status bar on the bottom has clickable areas that let you interact with other editor features.
Finally, it’s important to mention the Command Palette. This is a magic bar that opens up in the top center of the screen when you type F1 or Control-Shift-P (Command-Shift-P on a Mac). This gives you rapid access to many, many commands, and we’ll use it a lot.
Read more about the user interface here.
There are many, many amazing extensions to VSCode. I’ve chose a small number of them and bundled them into an extension pack. Install it by clicking on the extensions button in the activity bar and typing searching for History Hack Pack. Follow the links in the documentation to learn more about the individual extensions.
One common issue for people new to the command line is that it can be tough to understand the notion of location in the filesystem. Most ordinary users interact with their filesystems through the so-called GUI layer – the graphical interface of windows. Often the user-accessible files are more or less restyricted to special directories (or “folders”) with meaningful names like Desktop, MyDocuments, etc. However, once you start working at the command line this convenient feature can become something of a curse. It’s important to recognize that these special locations are just part of a complex, hierarchical filesystem – a branching tree of directories and files, on which your operating system relies in many ways. You will need to learn to navigate that filesystem, not from the GUI, but from the command line.
When you first start using the command line, it often feels (a) confusing and (b) somehow primitive or over-simple. The command line is, in fact, a sophisticated and incredibly efficient way to interact with the filesystem – but you need to learn your way around it first. In this class we won’t discuss the wonderful world of shell scripting (see below for guides to scripting); instead, I just want you to learn a few very basic commands to help you move around.
The file system is a “branching tree” of files and folders. At the top (or bottom, depending on how you imagine things) of the tree is the “root”. In bash, we represent this as /. Every folder has a path that starts with / and proceeds down the file hierarchy. So, for instance, my global git configuration is located at /home/matt/.gitconfig. / is the root. /home/ is where all user files can be found. /home/matt/ contains all my user files. /home/matt/.gitconfig identifies the specific file I’m looking for.
Your file explorer will represent this tree for you visually; you can also picture it schematically, as is done e.g. in the following image:

We can also explore from the command line. Here are a few basic commands to learn for this purpose. [ Note: in the screenshots below, my command prompt is heavily customized and includes some extra information. Most notably, it tells me when I am in a git repository and gives me the name of the current git branch. You can experiment with changing your bash prompt in the ~~/.bashrc~ file that controls many features of the
pwd is short for “print working directory”, and will show you where you are in the file system.

ls will list the contents of a directory. With no further arguments it will list the directory you’re currently in, but you can ask it to list some other directory too. Here are some examples. Note the “switches” -l and -la. Switches give further instructions to the command. In this case -l means “long” while -a is short for “all”. You can see in the screenshot below what the effect is.

Short for “change directory”, cd allows you to move through the filesystem.
cd someDirectoryNamewill move you into the subdirectory “someDirectoryName” of your current directory.cdwith no arguments, or “cd ~ “, will drop you back into your home directory (this is helpful if you get lost somehow). At the command line, the tilde (~~~) is short for “home directory”, so you can use it anywhere instead of typing out your whole whome directory name.cd ..orcd ../will move you “up” one level in the filesystem – so if you are currently in/home/matt/digitalHistory, executingcd ..will move you to/home/matt/.

Sometimes you want to look at the contents of a file. cat and less are two ways to do so. cat will print the contents of the file directly to your terminal window. less will create a simple interface that you can use to scroll through a longer file using a keyboard interface.

mkdir will create a new directory, while touch will create a new (empty) file.
mkdir some-directory-name
touch some-directory-name/somefile.txt
These commands will create the file somefile.txt in the folder some-directory-name, inside the current working directory.
often we make mistakes typing or are unsure of spelling, etc. Two kinds of shortcuts make for huge time savings:
- arrow keys can be used to navigate through your previous commands – typing
↑will reproduce your previous command, allowing you to correct any errors you might have made the last time you typed out some complex command and made a small error. Each time you type an↑, you will move one command up in the command history. To get back down, type↓. - you can type
TABpart way through a command to get a list of possible completions. If there’s only one possible command that starts with what you’ve typed so far, bash will complete it for you. Similarly, typing part of a file or directory name after a command has been entered will usually get you a list of possible completions. Try it a few times and you’ll see how much time it saves.
OK, that’s all for now, hopefully this helps you navigate around your projects. I may add to this guide as we go through the semester, but here are some further guides.
- this introduction is quite clear and simple
- the programming historian has a great guide too
- the TLDP guide introduced generations of programmers to bash scripting, and is still a useful reference point
npm) that your project “depends” on some group of other projects. This allows programmers to build constantly on each other’s work.
In our assignments, node dependencies are mostly used to enable the tests, whose main function is to help you figure out whether you’ve done the assignments correctly. Installing node dependencies is pretty simple, but can be confusing if you’re completely new to node, the command line, and programming in general. Here are the (very simple!) instructions:
- Install Node and NPM as per this section of the “Setup” instructions
- From the command line, navigate to the root directory of your repository using
cdas per the navigation help page - From the root directory of your repository,type the following command into the terminal/git-bash prompt:
npm install. Alternatively, if you have the VSCode extensions installed, you can run ~
You should see some complex output from the command, after which your node dependencies will be installed. You can actually see the installed files by browsing the contents of the node_modules directory, which should now be present in your working directory.
Once the dependencies are installed, you should be able to run the node tests with npm test (issued from the same directory, that is, the root directory of your repository). If you’ve installed the VSCode extentions, ou
I hope that helps!
Well the first assignment is done. Whew! There were some common git issues that came up, and I hope we can cut back on them by documenting them here.
The command line is very new to everyone, and I did a lousy job of explaining how to traverse the filesystem from the terminal. I have now posted some instructions that should help with this. Pro tip: in both Windows and Mac, you can open a terminal/git-bash window by right clicking on a location and clicking the “terminal here” or “bash window here” buttons (screenshots anyone?). This should help reduce the amount of time spent hopelessly floundering in the early stages of command-line training.
Mac users: MacOS creates these annoying files in every directory. They are useless for non-mac users and clutter up the repository. I have taken steps that should stop you from accidentally adding these files to your repository, but if you have already started work on Assignment 1 you may have cloned the repository too early to get the benefits of that work. Here’s how you remove `.DS_Store` files from a repository:
- first, navigate to the repository root directory in a terminal window
- then, type the following commands (dark magic!):
find . -name .DS_Store -print0 | xargs -0 git rm -f --cached --ignore-unmatch
echo ".DS_Store" >> .gitignore
git commit -a -m "Git thee behind me, .DS_Store"
For an explanation of these commands, you can look at random posts o n the Internet, ask Stackoverflow, or read the official manuals (at least on MacOS) by typing man find, man xargs, man echo, and man gitignore. A lot of those explanations will be kind of complicated, though, especially the (insanely complicated) find manual.
Note: this command doesn’t actually delete the files - -they will still be there, but git will act as though the files have been deleted, and will not “see” and files named .DS_Store when it looks for untracked files.
Deprecation notice: you shouldn’t have to follow these instructions. check to make sure that package-lock.json is not present in your web fork. If it is, then something has gone wrong and you should follow these steps.
Unfortunately I rather misunderstood how package-lock.json works (because of outdated documentation). As a result I have removed it from the repository. You should remove it, too. As above, you can do so by navigating to the repository root and typing:
git rm --cached package-lock.json
echo "package-lock.json" >> .gitignore
git commit -a -m "Goodbye, package-lock.json!"
Again, the file package-lock.json will still be on your computer, but git will act as though it had been deleted, and won’t ask you to change it anymore.
I’ve made some late-breaking changes to Assignment 1 to help with these issues. I’ve managed to push those changes to all of your repositories, so please pull in my changes by executing `git pull`. Everything below is DEPRECATED, but I’m keeping the info up here just in case something goes wrong.
You have 2 choices:
- take the steps described above, then manually update
package.jsonandtest/test-node.jsas described below - take the steps described above, then carefully read the new instructions – which tell you to name your reflection ~Reflection/reflection.md~ rather than ~Reflection/yourgithubid.md~ – and ignore the fact that your tests are failing
- take a chance and do some fancy gitwork as described in the final section, below.
I’ve updated the tests a little bit to make it easier to run automated tests. My recommendation is as follows:
- update
package.jsonso that it’s exactly the same as mine. You really don’t want there to be even 1 character of difference, or git might be mad at you. Here’s my current version, and here it is in the Github web interface.
Alternatively… you can take care of almost all of the above issues by pulling my changes directly from the assignment repository. But, beware! There’s a chance there will be “merge conflicts” and your whole repo will get screwed up. Still, here’s how i would do it:
- first, make sure all of your changes have been committed with
git commit -a -m "emergency commit" - Then make a note of the current git commit “hash” by executing
git log. The output will look kind of like this:
commit cf369d7a9d7282270a95ab1ff0f8718b84015bfb (HEAD -> development, origin/development)
Merge: bd1c351 734d07c
Author: Matt Price <matt.price@utoronto.ca>
Date:   Thu Jan 18 08:37:22 2018 -0500

    Merge tag 'fix-json' into development

    fix it!

commit 734d07cd1b25ff428d13b802b07741aed470c5cd (tag: fix-json, origin/master, origin/HEAD, master)
Merge: 62423b7 e9c8f65
Author: Matt Price <matt.price@utoronto.ca>
Date:   Wed Jan 17 22:07:30 2018 -0500

    Merge branch 'hotfix/fix-json'

commit e9c8f6507ec13a4c53cff1c35293fc2c70d68f8e
Author: Matt Price <matt.price@utoronto.ca>
Date:   Wed Jan 17 22:05:27 2018 -0500

    remove syntax-breaking comma

    travis build should succeed now
The strange string of numbers and letters is called the “commit hash”. Copy the one at at the top to a safe location. In this example the hash to save would be cf369d7a9d7282270a95ab1ff0f8718b84015bfb.
- now the dangerous step – pull from my repo and merge into yours!
git pull https://github.com/DigitalHistory/assignment-01-html-css.git master - if there are conflicts, you can either try to fix them, or (my recommendation) completely undo the merge by resetting your repo to the last working state. For this you need that hash you copied a couple of steps ago. This command will completely reset your master branch to the place it was before you tried to merge in my work:
git reset --hard cf369d7a9d7282270a95ab1ff0f8718b84015bfb(remember to use YOUR hash, not mine!)
Looking forward to hearing how all of this goes!
This is a preliminary introduction to the Git revision control system. Git is the most powerful and widely-used version control system in the world; it is primarily used by software developers but is enormously useful for any text-based document repository and is increasingly being used by humanists to share their work . You can find git repositories for most of my teaching materials, for instance.
I strongly recommend you follow this lesson up by reading the Git book, especially the first 2 or 3 chapters.
Most people love git once they start to use it, but it can be very frustrating and difficult at the beginning. We’ll go over it once, kind of quickly, then try a real-world example (checking out the first assignment.
History-Please
(This recapitulates much of what we did in the first class. Feel free to skip.) My friend Kate Hudson created a simple Github training exercise last year for some of my other students. It was really fun, so I modified it for us:
- Sign Up for a Github Account (or sign in if you already have an account)
- Navigate to my history-please repository
- Take a quick look at the README.
Can you understand it? Maybe we need to add some extra instructions
(like, what does
npm install -gmean? And where do those emoji come from?) What does the program do, and (if you can get this far) how does it work? At this point you can continue to follow these instructions, or just switch over to the README for a slightly more up-to-date explanation of forking, pulling, and merging. - Have you found where the History lives?
- Add a new piece of history from inside Github itself(!) by following the direction in the README under
Contributing.- Be sure to name the file “some-persons-name.md” (or “some-event-name.md”, or “some-trend-name.md”) so that everyone knows it’s written in Markdown
- follow Markdown syntax in writing your recipe (see this cheatsheet, especially the sections on Headings, Lists, and Links)
- When you save the file, Github will automatically create a forked repository under your account! Magic. Before you hit save, read the next step!!
- Important! You’ll be given a choice between “Committing directly to master” and “Creating a new branch”. Choose the latter option and then follow the instructions to submit a pull request. Amazing!
- When filling out the pull request, please take note of the “base” branch – by default, Github will not to this properly for you. Make sure that the base points to
titaniumbones/master. If you can’t figure this out, then commit to your own “master” branch. Then, navigate back to the front page, and create aNew Pull Requestby clicking on the button on the upper left. At this point my repo will be the only option you’re given.


<<outline-container-orgb642d09>>
On Mac and Windows, simply install Github Desktop. Command-line commands can be executed in the git shell within GH Desktop, or in the terminal.app on Mac. On Linux, use your package manager and the terminal, eg. on Ubuntu:
sudo apt-get install git
or on Arch
sudo pacman -S git
The git-it tutorial is also pretty helpful, so consider installing it.
Only)
<<text-org50aae1f>> All of the above functionality is also available via the command-line
- Choose an appropriate home for your repo and execute
git clone https://github.com/your-user-name/history-please.gitfrom the command line. The repository will be downloaded. - Add your directory to atom as a “project directory:
- Install the “git-plus” package in Atom
- Create a new file in the appropriate place.
- Choose menu item
Packages \rightarrow Git Plus \rightarrow Add, thenPackages \rightarrow Git Plus \rightarrow Commit, thenPackages \rightarrow Git Plus \rightarrow Push

There’s still tons to learn but this is a good start. If you are intrigued, keep reading.
<<outline-container-orge78fcc1>>
- Sign Up for a Github Account
- Install git w/out GHD
- Fork the Maps Assignment
- configure your git information
- Be sure you can authenticate with github
- Create a local copy of the history-please repository by
cloning it:
git clone git [at] github [dot] com:YOUR-USERNAME/history-please.git - Make some changes
- Commit your changes with
git commit -m "Useful Message Here" -a - optional Push your changes to the web with
git push - optional Submit a pull request
A git repository has three important “areas”, each of which represents a different “state”:
- Working Directory (Uncommitted)
- Staging Area (Staged)
- .git repository (Committed)
When you look at the repository, all you see is the working directory. So, if I want to start a new project, I create an empty directory, say, “Project”. Then I run the command:
git initThis command creates the invisible .git subdirectory, which is the
real heart of the repo: it stores all the information about previous and
current states of the repository.
Then let’s say I create a file and put some stuff in it. On the command line you’d do that this way:
echo "Hello, World" >> hello.txtI alert git to its existence with
git add hello.txtNow git sees that hello.txt exists, and the new file is “staged”.
Now execute:
git commit -a -m "initial commit of hello.txt"Git takes all of the changes from the “staging area”, and “commits” them
to the repository. All of this happens in the hidden .git directory –
you won’t notice any changes to the files that you actually see.
<<outline-container-org7a3a94e>>
<<text-org7a3a94e>> Every time you commit your changes in git, git saves a snapshot of the working directory to the .git repository. So, in principle, you can get back to any earlier working state of the repository, which is awesome.
- commit
- the most elementary operation in git is “committing”; this
saves your working directory to the repository. Here are the steps
- make some changes
- commit them with
git commit -a -m Message
- checkout
- To inspect some other state of the repository, you will
need to “checkout” that state:
git checkout HEAD~3will checkout the version you were working on 3 saves ago, for instance. - revert
- if you have totally screwed up your repository and want to
completely undo your changes, then use
git checkoutto check out the last working state. Now justgit commit -m "revert to working state". And you’re back to where you want to be.
<<outline-container-org62741fe>>
<<text-org62741fe>> Sometimes you want to be able to come back to a particular revision – maybe you have everything working fine, and you want to be sure you can get back to the working state. Maybe you create an “experiments branch” to work on; if it breaks, you can just switch back to the master branch with no harm done.
git branch # show branches
git branch -c experiment # create the experiment branch
git checkout experiment # chekout the experiment branch; then work on it for a while
git commit -a -m "added a cool new feature, but it doesn't quite work" # commit your changes
git checkout master # go back to the master branch, since it still lworks and you need to use it for something.
If you’re happy with your hcanges, maybe you want to actually commit them to the master branch:
git checkout experiment # chekout the experiment branch; then work on it for a while
git commit -a -m "added a cool new feature, and it works" # commit your changes
git checkout master # go back to the master branch
git merge experiment # "merge" your changes.
For our purposes, you should really only ever work on one branch at a time, or you’re likely to run into problems beyond the scope of this tutorial.
<<outline-container-orge471552>>
<<text-orge471552>> When you’re working together you may want to pull someone else’s changes or push your own to the group.
git pull # get the most recent branch of your original repository
git push # send all your commits on the current branch to the original repository
OK, that’s what I’ve got for now. Follow the excellent links near the top for more info. Good luck!
<<outline-container-org87403af>>
<<text-org87403af>> There are many other resources available online. You can try some of these.
- Hello World Guide on Github
- The excellent tutorial in the downloadable git-it application
- The sub-par Github Desktop documentation
- Helpful Tutorial on The Programming Historian.
- Git Immersion
- Official Git Book (quite technical)
- Click on this link. Your “proper” repo will be created, and you will be shown a link to the new repository.
- Clone the new repo. You know how to od this already – it can all be done from inside VSCode.
- Copy your json file to the right place in the new repo. Stage and commit the change
- Do the same with your reflection and your image files
- run npm install and npm test to confirm that everything’s good.
- push your changes
You should now be done!
There are many, many excellent JavScript resources on the web. I strongly recommend the MDN JavaScript Learning Pathway. I also have a very high opinion of Eloquent Javascript, but in past years students have often found it somewhat difficult. However, it rewards careful study, teaches excellent habits, and encourages creative thinking while coding. Both MDN and EJ have built-in JS Consoles forexperimenting with code (see below).
MDN also has a more advanced guide to JavaScript which starts with this “reintroduction”. This can be worth consulting if you want more information.
Sometimes you will want to try out your code and test out your ideas before putting them in a permanent file. There are various tools for this.
- Browser consoles and scratchpads
- Your browser has a built-in “console” where you can enter javascript commands and see their output. See the Setup doc for more info.
- node console
- Unfortunately, VSCode does not have a built-in javascript console. However, you can easily create one in a terminal window by running the command
node. Exit by typingControl-dorControl-c Control-cor.exit. - VSCode Debugger
- VSCode has an excellent debugger. However, debugging is a complicated subject. If you want to try to use these tools, read the docs.
- VSCode extensions
- There are many excellent VSCode extensions for JavaScript. You can experiment with quokka, for instance.
- Online Playgrounds
- These can be fantastic resources, but they make more sense for web-based programming. We may discuss these later in the course.
Jquery and Vanilla JS equivalents:
| Task | jQuery | “Vanilla” JS |
|---|---|---|
| Get all matching elements | $('selector') | document.querySelectorAll('selector') |
| Get first matching element | $('selector').first() | document.querySelector('selector') |
| Change CSS prop | $('selector').css('property-name', 'value') | document.querySelector('selector').style.property-name = 'value' |
const matches = document.querySelectorAll('selector') | ||
for (const m of matches) {m.style.property-name='value' | ||
| Change Text Value | $('selector').text('new text here') | document.querySelector('selector').textContent = 'new text here' |
const matches = document.querySelectorAll('selector') | ||
for (const m of matches) {m.textContent ='new text here' | ||
| Set inner HTML | $('selector').html('<tag>valid HTML here</tag>') | document.querySelector('selector').innerHTML = '<tag>valid HTML here</tag>' |
const matches = document.querySelectorAll('selector') | ||
for (const m of matches) {m.textContent ='<tag>valid HTML here</tag>' | ||
| Append to an element | $('selector').append('<tag>valid HTML here</tag>') | document.querySelector('selector').innerHTML += '<tag>valid HTML here</tag>' risky! |
| Remove a node | $('selector').remove() | let el = document.querySelector('selector'); el.parentNode.removeChild(el); |
Your textbook will be much more eloquent than I on this topic. Modifying the DOM – the Document Object Model – is the amazing wonderful coolest thing that Javascript does. This is a huge topic, but let’s quickly scratch the surface:
The DOM is a Javascript representation of the webpage. It is stored in a special object named document and can be both accessed (read) and manipulated (written) through that object’s many, many functions. The DOM takes the form of a tree:
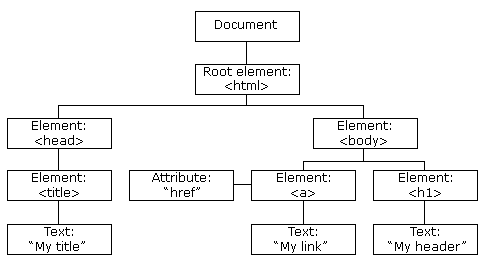
The individual nodes in the tree also have many functions that are available to use.
| <20> | <60> | <60> |
| Function (or Attribute) | What it does (or is) | Example |
|---|---|---|
| document.getElementsByClassName(class) | Takes a string argument (so, argument should be in quotes), and returns a list of nodes that have that class. | document.getElementsByClassName(“outline-2”) |
| document.createElement(type) | Creates a new element of type type | var link = document.createElment("a") will create a new “a” node, which can then be added to the DOM in some place (see below) |
| e.textContent | For an element or node “e”, the attribute e.textContent is the text of that node | if e is <td class=PM>Wilfred Laurier”</td>, then e.textContent is equal to “Wilfred Laurier” |
| e.href | Stores the “href” attribute of any element | link.href = "http://some.link"; This sets the “href” attribute to “http://some.link” |
| e.appendChild() | Creates a new node inside of the node “e” | Let’s create two new nodes: link.appendChild(document.createTextNode("some text")); node.appendChild(link); This first adds some text INSIDE the existing node “link”; the second places the whole link node inside the node named “node”. |
| e.style.[attribute] | Stores the various style attributes of nodes | e.style.background = "yellow"; turns the background of node e yellow |
| Function (or Attribute) | What it does (or is) | Example |
|---|---|---|
text.replace(/existing/g, "new") | if text is a string, replace “existing” with “new” whenever it occurs | text.replace(/ /g, "_") |
str.concat(text) | if str and text are strings, add text to the end of str. | w="https://en.wikipedia.org/wiki/";return w.concat(text); add “text” to the end of “https://en.Wikipedia.org/wiki/” and return that string. |
I’m not going to solve this one for you. But I will divide it into the following tasks:
linkifyClass needs to do this:
- retrieve all elements of class “PM”
- for each element (a
for ( __ of __)loop),- retrieve the text content
- create a Wikipedia link by concatenating “https://en.Wikipedia.org/wiki/” and the text text content
- call addLink with the parameters {current element}, {text content}, {Wikipedia url}
addLink needs to do this:
- clear the node by setting “node.textContent” or “node.innerHTML” to “”;
- create a new “a” element;
- set the href of the new element to “url”;
- append a child node to url with the value document.createTextNode(text);
- append the url to node
To do cooler stuff, like turning yellow, or linkifying all the classes, you’ll need to do some more work yourself.
Today in class we discussed spatial history, that is, history which focusses very strongly on the cultural history of space and place. There is nothing intrinsically digital about spatial history, nor is it necessarily qunatitative in nature; but the incredible development of Geographical Information Systems (GIS) in the last 15 years has made the use of interactive digital maps an attractive target for historians.
Sophisticated works such as the Spatial History Project and Ben Schmidt’s Whaling Maps Project take substantial technical effort to achieve their effects; in general, lengthy training in the use of specialized GIS software is required. We have our own example in the DECIMA Project run by Prof. Terpstra in our department.
Our approach will be decidedly more lightweight. In class today, we will build a very simple “Geographical Information System” around a Google Map. Google Maps are, in fact, highly sophisticated GIS’s, with powerful tools for accessing various layers of information; but in order to work with them, we will need to use a very small amount of Javascript.
Today’s exercise is also something of a test. We will be working in the markdown syntax (github flavour), and you will also be able to choose between
- working in the JSBin Online Editor, which we saw briefly in the first class, and using a copy you can download and work with on your own.
The latter version also serves as an introduction to the Github code-sharing platform. If you continue working with code-based academic projects, you will eventually want to learn more about git, which is an enormously powerful resource. Our next assignment will also be made available on Github, so this is a chance to get a head start. If you want to work locally, I strongly recommend the newly-released Atom Code Editor. If you also install the atom-html-preview package, you will get live updates of your code in a second tab, almost like in jsbin. See the documentation for more info.
GIS is just a name for any system that tries to capture, manipulate, and represent geographical data. There are many GIS tools; the history department uses ArcGIS, which is expensive and something of an industry standard, while many independent scholars use QGIS, which is free, open source, and not quite as powerful as Arc.The data in a GIS is all geotagged, that is, assigned a set of geographical co-ordinates. This sounds simple but it is actually quite complex, since any co-ordinate system is a simplified projection of real, disordered, 3-dimensional space. Many of the frustrations of working with GIS comes from the difficulty of rendering (say) historical map images commensurate with modern, satellite-derived maps.
Within a GIS, information is generally accessed as a set of layers. Data of specific types is stratified in layers, in much the same way that one creates image layers in photoshop. This image gives a typical example. Note that the creation of layers is itself an intellectual decision, relying on judgments about the relationships between individual bits of data. http://iolandarch.com/wp-content/uploads/2014/09/overlay-analysis.jpg
For our exercise today, we are really only interested in two layers: the “basemap”, that is, the street or satellite map most of us use on an almost-daily basis; and the marker layer, in which all of the little pins on a map are stored. We access these layers, and create those markers, with Javascript, by making calls to the Google Maps API.
You don’t have to understand the Google Maps API very thoroughly to be able to do this assignment. The code comes pre-written; all you have to do is hack at it till it does what you want it to.
It was useful to learn HTML but it is a pain to generate it by hand. You do have to do some hand-coding of HTML for this exercise, because some of the work actually happens in Javascript; but the rest of it can be done in markdown, which I find much easier to write than HTML.
# one or more '#' marks indicates a headline

### this one is "level 3"

*a single asterisk is emphasis, or italics*

**two are strong, or bold**

An empty line separates paragraphs.

> blockquotes are made with angle brackets
> like this
You can also mix HTML in with markdown and it will generally render perfectly well. This is important for us because we have to create some <div> elements, which markdown can’t do for us.
While you’re coding, reflect on the satisfaction that good, honest work brings to the act of electronic communication.
Today you will create a web page containing a Google Map. The Google Map will contain 1-3 markers related to one of the themes we wrote on the blackboard in our last class. It will also contain a VERY brief essay that discusses the historical significance of the events represented by those markers, all the while paying homage to the project of spatial history: foregrounding the spatial elements of the historical narrative at hand. You’re not handing in your work, so don’t fret too much. Try to enjoy yourself; but also work hard, as this is good preparation for our next assignment, which wil lbe handed out in class on Thursday.
I have made the Javascript as simple as I can. There are more efficient and interesting ways to do this, but they are a little more complex. To make your markers – and to re-centre your map – you will need to modify the Javascript directly.
I think the only modifications you will need to make to the HTML are within the special “textarea” block containing the markdown syntax. The rest you can probably safely ignore, though you might learn something from looking at it.
The CSS for this exercise is deceptively simple. We make only a few small changes tothe defaults, but we are cheating here. The strapdown javascript library which enables us to magically write using markdown, also magically loads the incredible bootstrap web development framework, which includes some sophisticated CSS. Try changing the first textarea’s theme=united to one of the other supported “swatches” – I’m a fan of “cyborg” and “slate”, myself.
Voyant is a mid-level textual analysis tool; it is quite a bit more complex and flexible than either Wordle or Textexture, but it is still a GUI tool, aimed at end-users who may not be comfortable with coding or the command line. Note that, if you are really serious about quantitative modelling, you will need more sophisticated and adaptable tools, such as Mallet or R. At this point, most large-scale DH projects are using homebrewed solutions that cobble together various pieces of modelling infrastructure, with varying degrees of success. In our next class, we’ll explore some of the challenges of that kind of work. But for today: Voyant!
Voyant is actually a suite of tools, all of which operate on the same corpus. So, in order to use it, you will have to import a corpus. You can use a single text for this purpose, but a large collection of texts is much better.
First, let’s navigate to the Voyant Website. Note that we are using the Beta version of Voyant 2.0; it is way better than the 1.0 version, and pretty stable. There are 2 built-in corpora: Shakespeare’s plays, and Austen’s novels. For now, let’s choose Austen’s novels by clicking on “Open” (bottom right of text box) or using this link (or this one if you are running a local copy on your computer). Let’s steal some clues from this excellent tutorial, e.g., this picture: http://docs.voyant-tools.org/files/2015/06/voyant-austen-numbered.png
- Cirrus: a simple wordcloud that displays the highest frequency terms in the corpus (that aren’t in the stopword list)
- Reader: a infinite scrolling reader for the actual text in the corpus (this fetches the next part of the text as needed)
- Trends: a visualization of word frequency across the corpus or within each document (depending on the mode)
- Summary: a high-level summary of data from the corpus
- Contexts: a list of occurrences of a specified word (this is sometimes called a concordance or a keyword in context)
These are only some of the tools available in Voyant – you can learn about more such tools in the tutorial linked above. But essentially, we have:
- a cloud visualization tool, which is pretty good for suggesting but not so great for demonstrating
- several frequency analysis tools which allow comparison within or across texts;
- various scoping controls which allow you to move between a single-text view and a corpus-level view
So, we have the text. We have the tools. Now, we need questions. Let’s take a few minutes together to consider the following:
- what kinds of questions are amenable to quantitative analysis?
- which ones can potntially be answered using these tools and this corpus?
- maybe the most interesting questions are too hard. Can we simplify the questions to suit the tools?
Bear in mind the kinds of questions Moretti has suggested we ask: questions about form, change over time, place.
In groups of 2-3, take about 20 minutes to fool around with Austen’s texts, seeing if you discover anything interesting.; and then take 5 minutes to report back to the group.
So far, most of our work has dealt with literature. Let’s try another genre. The Emory University library has an interesting exercise using a digitized collection of American sermons given immediately after the assassination of Abraham Lincoln in 1865. What can we learn from them?
This is just barely more complicated than last time, because we have to add the corpus ourselves. First, download all the sermons and unzip the downloaded file. Then, go back to the Voyant start page and click on “upload”; and finally, select all the files in the “text” folder from the download.
Again, we have to aks the question: what can we learn from the bulk analysis of these texts? Or, maybe, can we compare some of the sermons to each other and learn something from that process?
- Note that the original tutorial uses only two sermons, those of Lowe (from South Carolina) and White (from Vermont). Why?
Let’s spend a few minutes thinking about questions, together.
As before: in small groups, check out these texts and see if you see anything interesting.
Ooops, forgot to write this up separately. Oh well. By now, though, you know the drill:
- Navigate to the Github repository for this exercise.
- Download and unzip the files
- Open them up in your text editor
This will get you ready for your next assignment.
You may find it useful, as you prepare for the next assignment, to read the following post!Popcorn is a Javascript “library” – a small collection of programs – that lets web designers key events in a web page to a time-code in a media file. So essentially, popcorn lets you “cue up” content ad display it only during fixed periods, while a media element is playing. If you then pause or manually rewind/fast-forward the media element (audio or video), the events will also reset to the appropriate time.
Popcorn works because of new (actually, not so new!) functionality that is provided by the HTML5 standard, and in particular the <audio> and <video> tags. This standard lets you manipulate audio and video directly with HTML and Javascript – something that wasn’t possible until about five years ago.
Popcorn is a sort of Swiss army knife for doing multi-media work in HTML5. There’s a main framework – the popcorn library – that provides a simple Javascript interface for talking directly to the media elements. Doing that directly can be hard, so the Popcorn “layer” makes this work quite a bit easier. This underlying library is used by the Popcorn plugins, which are the elements you will actually be working with. These plugins are fairly simple Javascript programs (the mapping ones are actually kinda complex, and some of the things one wants to do with maps – especially smoothly animate a pan from one location to another – aren’t available yet, which is too bad and a bit of a disappointment). It’s the plugins that you will actually be working with.
To use popcorn in a web page, you need to define a variable – usually named ‘pop’ – that creates a popcorn ‘instance’ on your web page. Then you wrap the variable definition in a simple function that makes sure it gets run when the web page loads.
Inside the variable definition, you “call” the plugin function for each event you want to create. The process is very similar to creating timeline events in your timeline – there’s a simple syntax that defines a couple of “parameters” – variables that get “passed” to the plugin function. The example file defines a bunch of popcorn events; essentially you’ll just change the values of these parameters to create your own events. So for instance, here’s an example plugin definition:
let pop=Popcorn('#media')
// the leading "." says "call the `footnote` method of the new `pop` object"
.footnote({"id":"intro","start":6,"end":16,"target":"popcorn-container","text":"Edna begins by talking about her father, Daniel Kelly (1861-1953). The US census of 1880 for Elgin, IL, gives Daniel’s occupation as blacksmith. In the 1900 census of Port Angeles his occupation is bridge builder; in the 1920 census of Eden Valley it is general farming; in the 1920 census of Eden Valley it is dairy farming.  In the 1930 census of Port Angeles he is retired."})
This is one of the plugins you can use if you like – the footnote plugin. It has just five parameters:
- id – this is for your benefit so you can keep track of what you’re doing. Use it, but don’t worry about it too much
- start – when to start playing the element. This is in SECONDS – so forinstance if you want to it to start playing at 6:34, the value would be 394. Keep a calculator on hand. Note that the value is not in quotation marks – that’s significant.
- end – the end time
- target – where to pop up the event. Don’t change this, or your events will show up in the wrong place. With popcorn you can put the new events anywhere on the page, and change any existing element. It’s really powerful; we’re just brushing the tip of the iceberg.
- text – this is the text you’re going to make appear. This is where your own contribution really comes in.
I’ve provided examples for as many plugins as I could. All should work as-is:
- Footnote you’ve just seen
- Figure lets you display an image. This adds a new parameter – ‘src’ – which let you select an image and also link that image to another location, if you so wish. (I haven’t tested the linking os it may not be implemented yet).
- Google Maps Creates a google map. There are a bunch of new parameters here, see our source code for more info.
- Leaflet Maps offers a slightly more familiar interface, though the problem with slow tile loading still persists.
- Markdown allows you to add markdown annotations
- Wikipedia will add the first few paragraphs from a Wikipedia page.
- Webpage will embed a webpage in an iframe
(The links in this section take you to the plugin sourcecode, which will usually be a directory with 4 files. The html file contains a working example of the plugin code. The js file is the sourcecode itself, and usually starts off with a useful explanation of how the plugin works. The last two files are provided for testing purposes, you shouldn’t need to have use them.)
You can explore the rest of the plugins as you wish; you may need to add some extra columns to your spreadsheet to get them to work. In particular, Timeline adds some interesting options, and I like wordirver, but it isn’t currently behaving properly and needs to be rewritten (don’t have time right now!)
Popcorn works by keying commands to a media element – that is, an HTML tag <audio> or <video>. Here’s our sample audio tag:
<!-- this is our audio div.  It's really important -->
 <audio id="media" controls="controls">
   <source src="media/audio/editededna.mp3" type="audio/mp3" />
</audio>
I just want you to note three things about this code:
- See how the <audio> tag has two attributes. The id is essential, because when we defined “pop” we told it to look for the element called “id”. “controls” is also important – it ensures that you can pause, rewind, etc. in the browser’s buiilt-in media player.
- The actual file that will be used by the “audio” element is not defined in the tag itself, but within it – in the <source> tags.
Our default example plays a local media file from a statically-defined media element. I really hope you will choose to follow this method, though a web-based media element works just as well. However, if you need to, you can use Vimeo and Youtube videos, as well as Soundcloud audio. To do that, you will need to rewrite the project HTML a bit. So, instead of this,
<!-- this is our audio element.  It holds the audio file. -->
<audio id="media" controls="controls">
    <!-- Make sure this points to the actual mp3 file you are analyzing -->
    <source src="https://storycorpsorg-staging.s3.amazonaws.com/uploads/walsh2-1.mp3"
            type="audio/mp3" />
</audio>
You will want something like this:
<section id=#media></section>Then, you’ll need to modify line 6 of popcorn-data-from-google.js:
pop = Popcorn("#media")and use something like one of the models below:
https://youtu.be/FvR2LWEdNLk
const pop = Popcorn.smart( "#media", "http://www.youtube.com/watch?v=9oar9glUCL0" );
// const pop = Popcorn.smart( "#media", 'https://vimeo.com/267718090' );
// const  = Popcorn.smart( "#media", 'https://soundcloud.com/corbanbrook/leaving-on-a-spaceship' );
the soundcloud player is a little buggy – it emits a loud crackle when you start playback, and the ‘play’ button needs to be pushed twice. Also, there are no built-in volume controls (!). In fact, we have to add a little bit of hacky code to get the player to work at all. So you’ll need something like this, on say line 22 (ish):
pop.media.controls = true;
pop.unmute();
pop.media.volume = 65;
set the volume to whatever level feels right as the user won’t be able to change it.
If you end up confused, there are a couple of useful popcorn resources on the web.
- alas, most of the old resources have been taken down in the past 2 years. All that’s really left is the Github repo and the docs website, and both have been derelict for about 6 months. You can see my changes in my main pull request, and browse through the issues I’ve been submitting, especially number 80.
In its day, Popcorn was designed for cutting-edge features that were just making their way to ghe browser. Now, no so much: the framework fails to take advantage of many of the new features of CSS3, and plugins are full of ugly, hard-coded CSS that can be hard to deal with. I have started to fix this issue, and in the plugins you are likely to use, much of the ugliest CSS has been stripped out. Instead, most plugins now neatly generate their own boxes (usually a `div` element) with an id and a class that you can set in CSS.
For the assignment, I have set the popcorn container element to display: flex, which is a pretty good default choice. Most events will attempt to set a width of 30em, or about the width of 30 characters, and then grow or shrink if they have to. This default works well for most kinds of information, but not for all, so I’ve provided some examples of how to modify the default size. You can set the element id for most plugins with the id column of the spreadsheet, and most plugins now add a class like PLLUGINNAME-plugin to their enclosing element.
In class, we hand-coded our popcorn events. This is not particularly onerous but is a little clumsy. You are absolutely welcome to use this method for the assignment if you like; but there is another way. the tabletop.js library lets you access information from a Google Spreadsheet and plug it into your scripts. I find it very handy for this kind of work (we could have used it for the mapping expercise, too). In this way, you can create your popcorn events in the leisure of a Google Spreadsheet, and have the events automatically generated for you whenbever your web page loads.
The process is described in the tabletop repository, and you are strongly advised to read it carefully. If you want to use the code I’ve provided for you in popcorn-data-with-google.js, you will need to copy this spreadsheet, then publish it as described in the tabletop instructions (see above), and also copy the new URL into the appropriate place in popcorn-data-with-google.js. Then code your popcorn in the spreadsheet; unless you make any syntax errors, the technical work should now be done. In the spreadsheet it is somewhat easier, for instance, to arange your events in sequence, etc.