-
Notifications
You must be signed in to change notification settings - Fork 202
docs: add Keycloak Auth with Apache APISIX blog #799
New issue
Have a question about this project? Sign up for a free GitHub account to open an issue and contact its maintainers and the community.
By clicking “Sign up for GitHub”, you agree to our terms of service and privacy statement. We’ll occasionally send you account related emails.
Already on GitHub? Sign in to your account
Merged
Merged
Changes from 3 commits
Commits
Show all changes
4 commits
Select commit
Hold shift + click to select a range
File filter
Filter by extension
Conversations
Failed to load comments.
Loading
Jump to
Jump to file
Failed to load files.
Loading
Diff view
Diff view
There are no files selected for viewing
12 changes: 9 additions & 3 deletions
12
website/blog/2021/12/07/apisix-integrate-skywalking-plugin.md
This file contains hidden or bidirectional Unicode text that may be interpreted or compiled differently than what appears below. To review, open the file in an editor that reveals hidden Unicode characters.
Learn more about bidirectional Unicode characters
4 changes: 3 additions & 1 deletion
4
website/blog/2021/12/08/apisix-integrate-rocketmq-logger-plugin.md
This file contains hidden or bidirectional Unicode text that may be interpreted or compiled differently than what appears below. To review, open the file in an editor that reveals hidden Unicode characters.
Learn more about bidirectional Unicode characters
210 changes: 210 additions & 0 deletions
210
website/blog/2021/12/10/integrate-keycloak-auth-in-apisix.md
This file contains hidden or bidirectional Unicode text that may be interpreted or compiled differently than what appears below. To review, open the file in an editor that reveals hidden Unicode characters.
Learn more about bidirectional Unicode characters
| Original file line number | Diff line number | Diff line change |
|---|---|---|
| @@ -0,0 +1,210 @@ | ||
| --- | ||
| title: "How to Integrate Keycloak for Authentication with Apache APISIX" | ||
| authors: | ||
| - name: "Peter" | ||
| title: "Author" | ||
| url: "https://github.com/starsz" | ||
| image_url: "https://avatars.githubusercontent.com/u/25628854?v=4" | ||
| - name: "Sylvia" | ||
| title: "Technical Writer" | ||
| url: "https://github.com/SylviaBABY" | ||
| image_url: "https://avatars.githubusercontent.com/u/39793568?v=4" | ||
| keywords: | ||
| - Apache APISIX | ||
| - Keycloak | ||
| - Authentication | ||
| - Integration | ||
| description: This article shows you how to use OpenID-Connect protocol and Keycloak for identity authentication in Apache APISIX through detailed steps. | ||
| tags: [Technology] | ||
| --- | ||
|
|
||
| > This article shows you how to use OpenID-Connect protocol and Keycloak for identity authentication in Apache APISIX through detailed steps. | ||
|
|
||
| <!--truncate--> | ||
|
|
||
| [Keycloak](https://www.keycloak.org/) is an open source identity and access management solution for modern applications and services. Keycloak supports Single-Sign On, which enables services to interface with Keycloak through protocols such as OpenID Connect, OAuth 2.0, etc. Keycloak also supports integrations with different authentication services, such as Github, Google and Facebook. | ||
|
|
||
| In addition, Keycloak also supports user federation, and can import users through LDAP and Kerberos. For more information about Keycloak, please refer to the [official documentation](https://www.keycloak.org/about). | ||
|
|
||
| ## How to Use | ||
|
|
||
| ### Environment Preparation | ||
|
|
||
| Make sure that Apache APISIX is started in your environment before proceeding with the following steps. | ||
|
|
||
| #### Start Keycloak | ||
|
|
||
| Here we use `docker-compose` to start Keycloak with PostgreSQL. | ||
|
|
||
| ```yaml | ||
| version: '3.7' | ||
|
|
||
| services: | ||
| postgres: | ||
| image: postgres:12.2 | ||
| container_name: postgres | ||
| environment: | ||
| POSTGRES_DB: keycloak | ||
| POSTGRES_USER: keycloak | ||
| POSTGRES_PASSWORD: password | ||
|
|
||
| keycloak: | ||
| image: jboss/keycloak:9.0.2 | ||
| container_name: keycloak | ||
| environment: | ||
| DB_VENDOR: POSTGRES | ||
| DB_ADDR: postgres | ||
| DB_DATABASE: keycloak | ||
| DB_USER: keycloak | ||
| DB_PASSWORD: password | ||
| KEYCLOAK_USER: admin | ||
| KEYCLOAK_PASSWORD: password | ||
| PROXY_ADDRESS_FORWARDING: "true" | ||
| ports: | ||
| - 8080:8080 | ||
| depends_on: | ||
| - postgres | ||
| ``` | ||
|
|
||
| ```shell | ||
| docker-compose up | ||
| ``` | ||
|
|
||
| After execution, you need to verify that Keycloak and postgres have started successfully. | ||
|
|
||
| ```shell | ||
| docker-compose ps | ||
| ``` | ||
|
|
||
| #### Configure Keycloak | ||
|
|
||
| After Keycloak is started, use your browser to access "http://127.0.0.1:8080/auth/admin/" and type the `admin/password` account password to log in to the administrator console. | ||
|
|
||
| ##### Create a realm | ||
|
|
||
| First, you need to create a realm named `apisix_test_realm`. In Keycloak, a realm is a workspace dedicated to managing projects, and the resources of different realms are isolated from each other. | ||
|
|
||
| The realm in Keycloak is divided into two categories: one is the `master realm`, which is created when Keycloak is first started and used to manage the admin account and create other realm. the second is the `other realm`, which is created by the admin in the master realm and can be used to create, manage and use users and applications in this realm. The second category is the other realm, created by admin in the master realm, where users and applications can be created, managed and used. For more details, please refer to the [realm and users section in Keycloak](https://www.keycloak.org/docs/latest/getting_started/index.html#realms-and-users). | ||
|
|
||
| 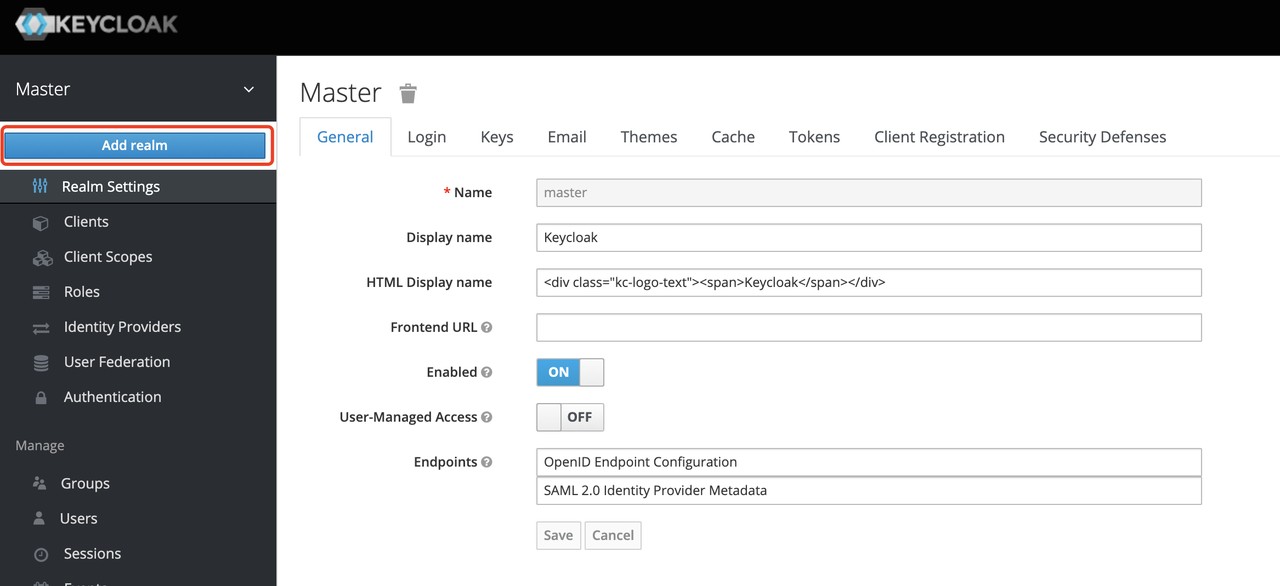 | ||
|
|
||
| 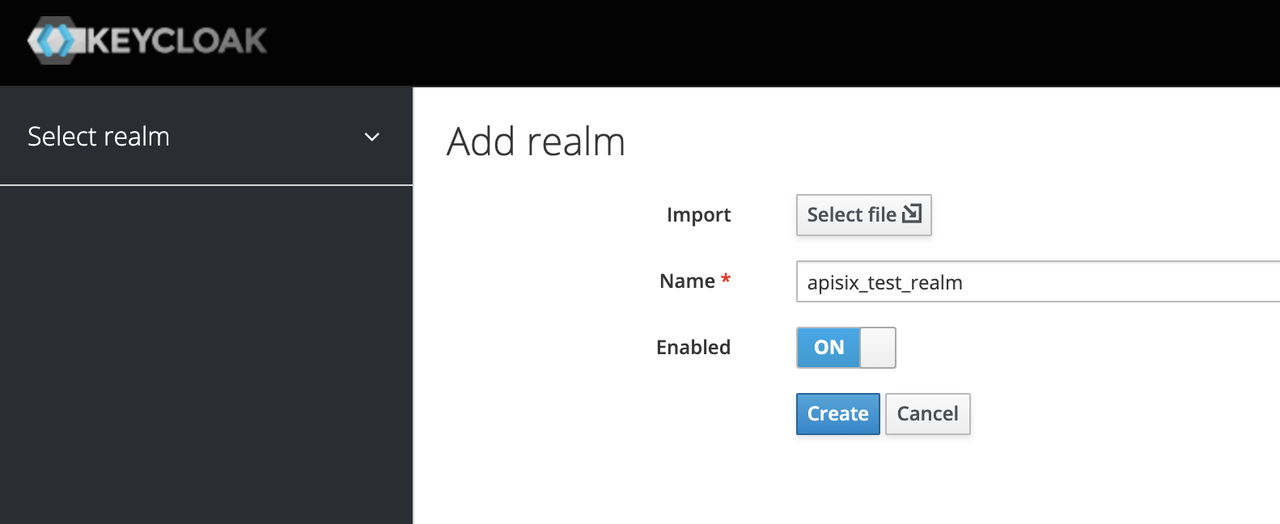 | ||
|
|
||
| ##### Create a Client | ||
|
|
||
| The next step is to create the `OpenID Connect Client`. In Keycloak, Client means a client that is allowed to initiate authentication to Keycloak. | ||
|
|
||
| In this example scenario, `Apache APISIX` is equivalent to a client that is responsible for initiating authentication requests to Keycloak, so we create a Client with the name `apisix`. More details about the Client can be found in [Keycloak OIDC Clients](https://www.keycloak.org/docs/latest/server_admin/#_oidc_clients). | ||
|
|
||
| 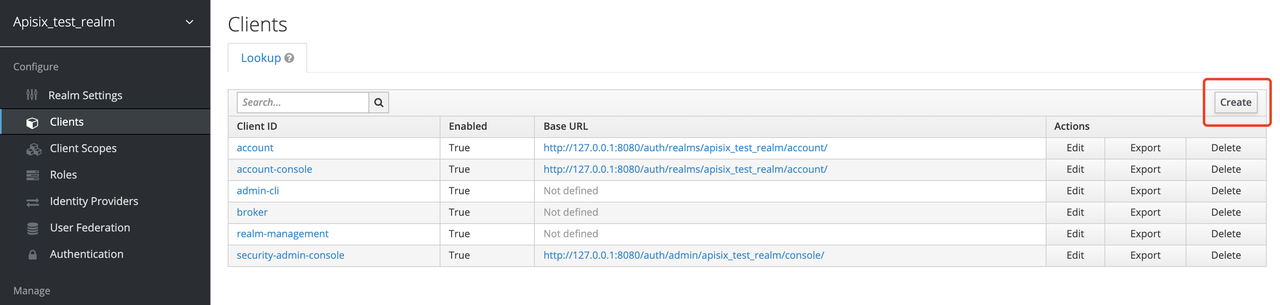 | ||
|
|
||
| 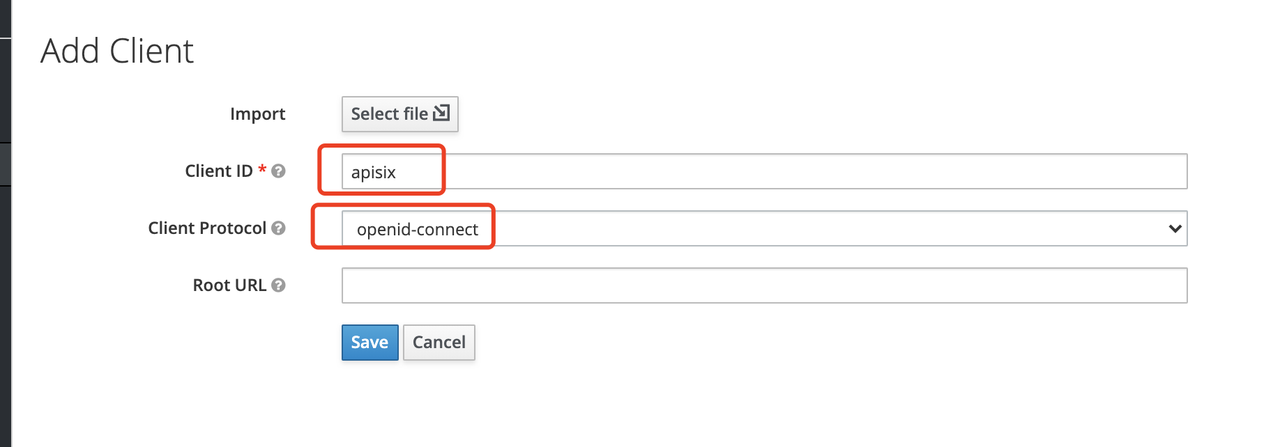 | ||
|
|
||
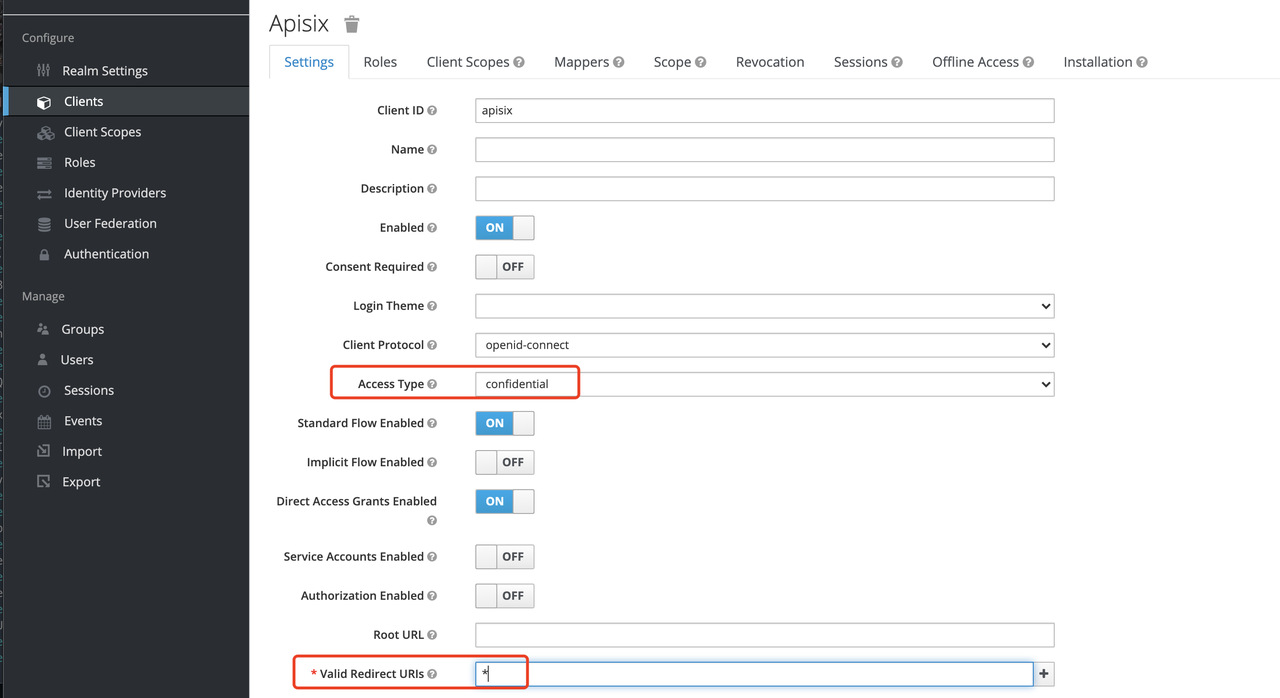
| ##### Configure the Client | ||
|
|
||
| After the Client is created, you need to configure the Apache APISIX access type for the Client. | ||
|
|
||
| In Keycloak, there are three types of Access Type: | ||
|
|
||
| 1. **Confidential**: which is used for applications that need to perform browser login, and the client will get the `access token` through `client secret`, mostly used in web systems rendered by the server. | ||
| 2. **Public**: for applications that need to perform browser login, mostly used in front-end projects implemented using vue and react. | ||
| 3. **Bearer-only**: for applications that don't need to perform browser login, only allow access with `bearer token`, mostly used in RESTful API scenarios. | ||
|
|
||
| For more details about Client settings, please refer to [Keycloak OIDC Clients Advanced Settings](https://www.keycloak.org/docs/latest/server_admin/#advanced-settings). | ||
|
|
||
| Since we are using Apache APISIX as the Client on the server side, we can choose either "confidential" Access Type or "Bearer-only" Access Type. For the demonstration below, we are using "confidential" Access Type as an example. | ||
|
|
||
|  | ||
|
|
||
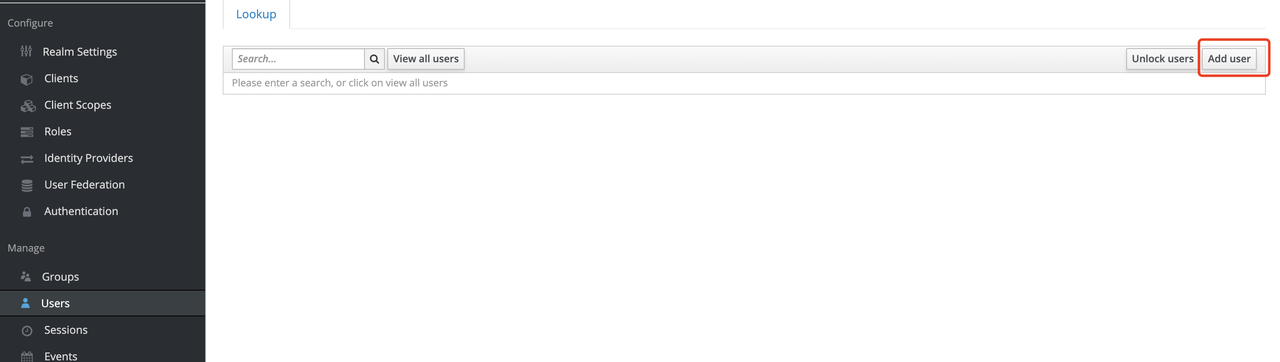
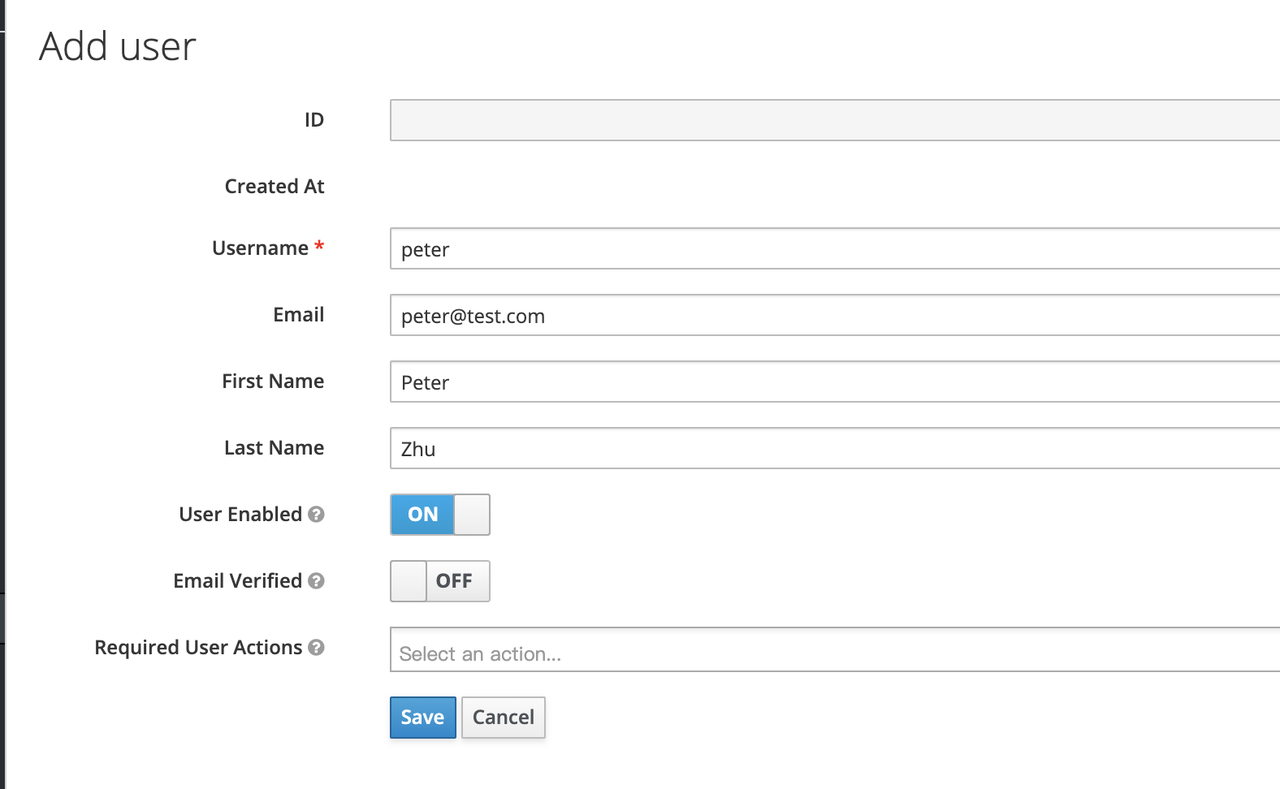
| ##### Create Users | ||
|
|
||
| Keycloak supports interfacing with other third-party user systems, such as Google and Facebook, or importing or manually creating users using LDAP . Here we will use "manually creating users" to demonstrate. | ||
|
|
||
|  | ||
|
|
||
|  | ||
|
|
||
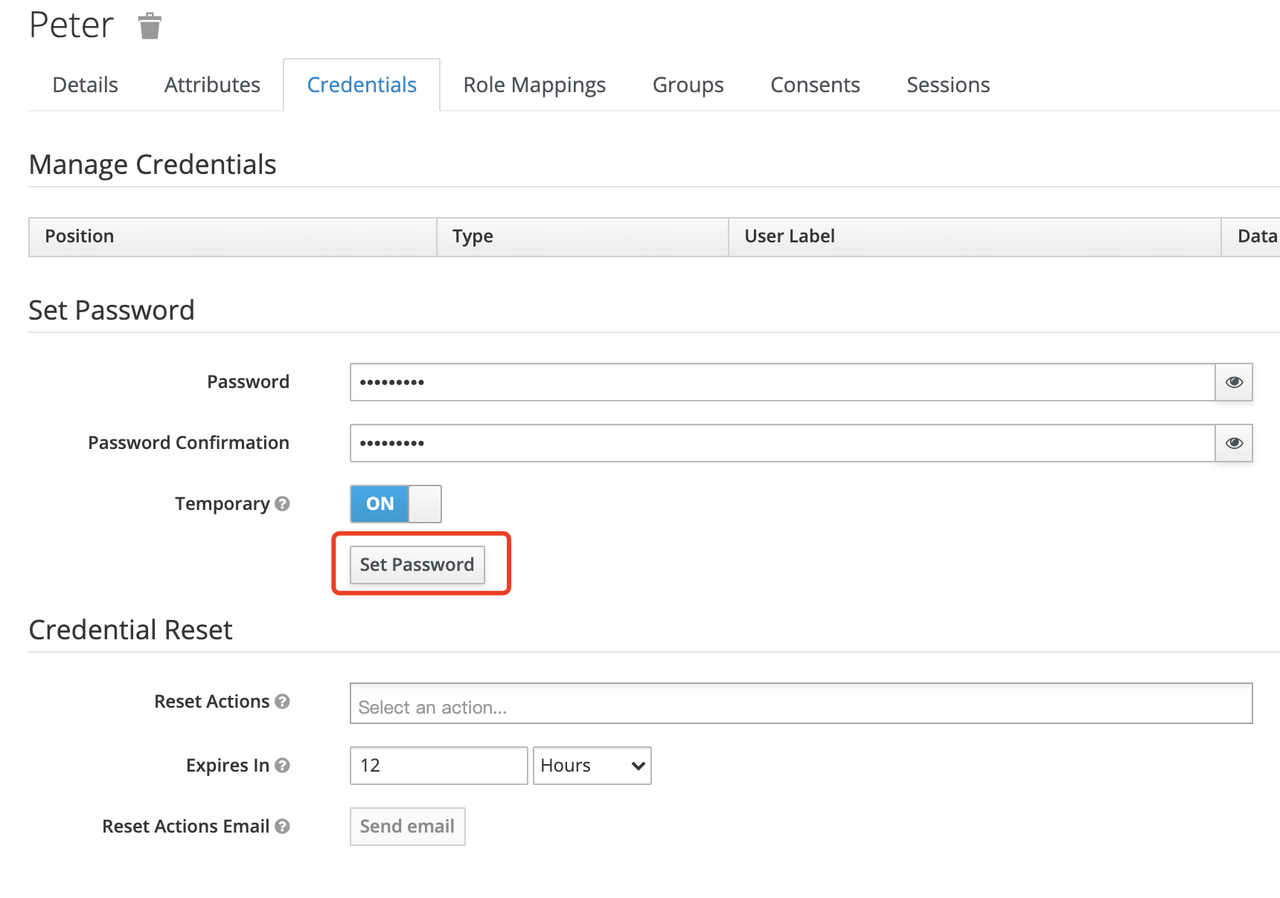
| Then set the user's password in the Credentials page. | ||
|
|
||
|  | ||
|
|
||
| #### Create Routes | ||
|
|
||
| After Keycloak is configured, you need to create a route and open the `Openid-Connect` plugin . For details on the configuration of this plugin, please refer to the [Apache APISIX OpenID-Connect plugin](https://apisix.apache.org/docs/apisix/plugins/openid-connect). | ||
|
|
||
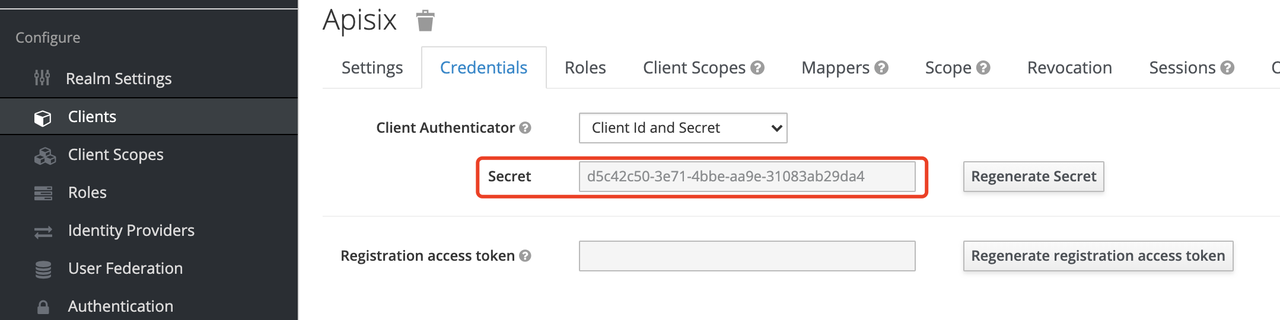
| ##### Get client_id and client_secret | ||
|
|
||
|  | ||
|
|
||
| In the above configuration. | ||
|
|
||
| * `client_id` is the name used when creating the Client before, i.e. `apisix` | ||
| * `client_secret` should be obtained from Clients-apisix-Credentials, for example: `d5c42c50-3e71-4bbbe-aa9e-31083ab29da4`. | ||
|
|
||
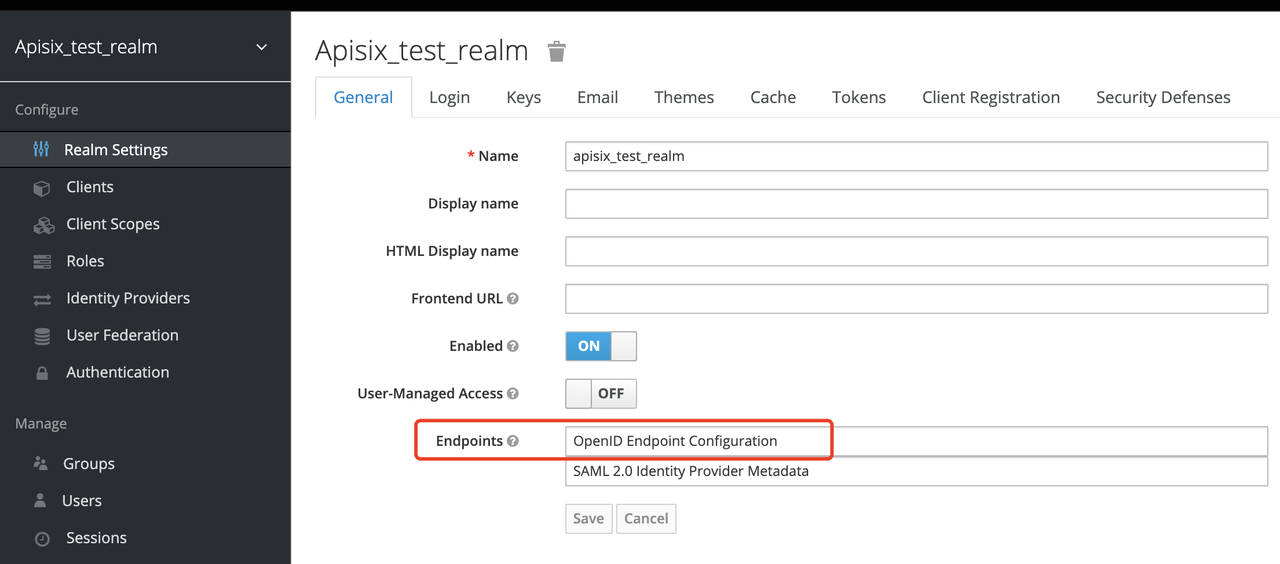
| ##### Get the discovery configuration | ||
|
|
||
|  | ||
|
|
||
| Go to Realm Settings-General-Endpoints, select the `OpenID Endpoint Configuration` link and copy the address that the link points to, for example:`http://127.0.0.1:8080/auth/realms/apisix_test_realm/.well-known/openid-configuration`. | ||
|
|
||
| ##### Create a route and enable the plug-in | ||
|
|
||
| Use the following command to access the Apache APISIX Admin interface to create a route, set the upstream to `httpbin.org`, and enable the plug-in OpenID Connect for authentication. | ||
|
|
||
| > Note: If you select `bearer-only` as the Access Type when creating a Client, you need to set `bearer_only` to true when configuring the route, so that access to Apache APISIX will not jump to the Keycloak login screen. | ||
|
|
||
| ```shell | ||
| curl -XPOST 127.0.0.1:9080/apisix/admin/routes -H "X-Api-Key: edd1c9f034335f136f87ad84b625c8f1" -d '{ | ||
| "uri":"/*", | ||
| "plugins":{ | ||
| "openid-connect":{ | ||
| "client_id":"apisix", | ||
| "client_secret":"d5c42c50-3e71-4bbe-aa9e-31083ab29da4", | ||
| "discovery":"http://127.0.0.1:8080/auth/realms/apisix_test_realm/.well-known/openid-configuration", | ||
| "scope":"openid profile", | ||
| "bearer_only":false, | ||
| "realm":"apisix_test_realm", | ||
| "introspection_endpoint_auth_method":"client_secret_post", | ||
| "redirect_uri":"http://127.0.0.1:9080/" | ||
| } | ||
| }, | ||
| "upstream":{ | ||
| "type":"roundrobin", | ||
| "nodes":{ | ||
| "httpbin.org:80":1 | ||
| } | ||
| } | ||
| }' | ||
| ``` | ||
|
|
||
| ### Access Testing | ||
|
|
||
| Once the above configuration is complete, we are ready to perform the relevant access tests in Apache APISIX. | ||
|
|
||
| #### Access Apache APISIX | ||
|
|
||
| Use your browser to access http://127.0.0.1:9080/image/png. | ||
|
|
||
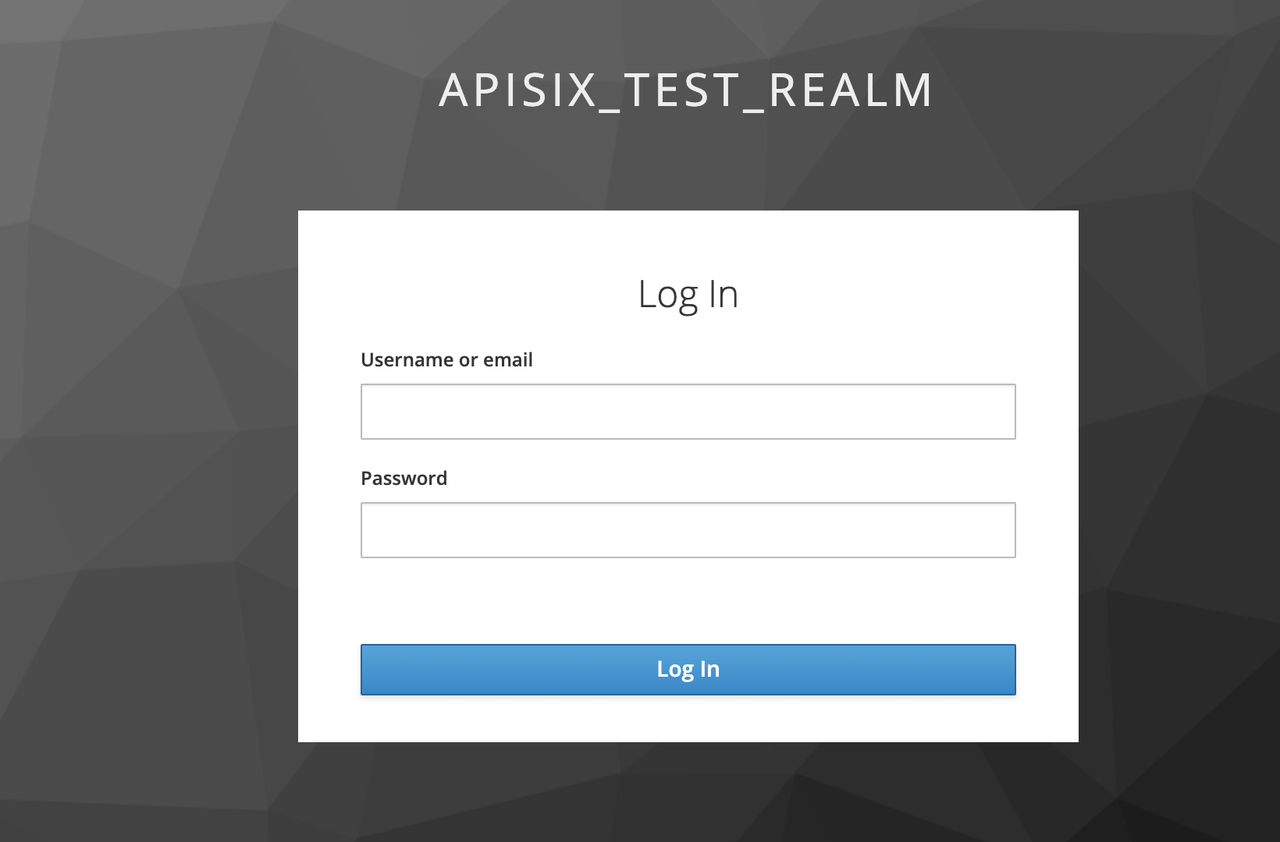
| Since the OpenID-Connect plugin is enabled and `bearer-only` is set to `false`, when you access this path for the first time, Apache APISIX will redirect to the login screen configured in `apisix_test_realm` in Keycloak and make a user login request. | ||
|
|
||
|  | ||
|
|
||
| Enter the User peter created during the Keycloak configuration to complete user login. | ||
|
|
||
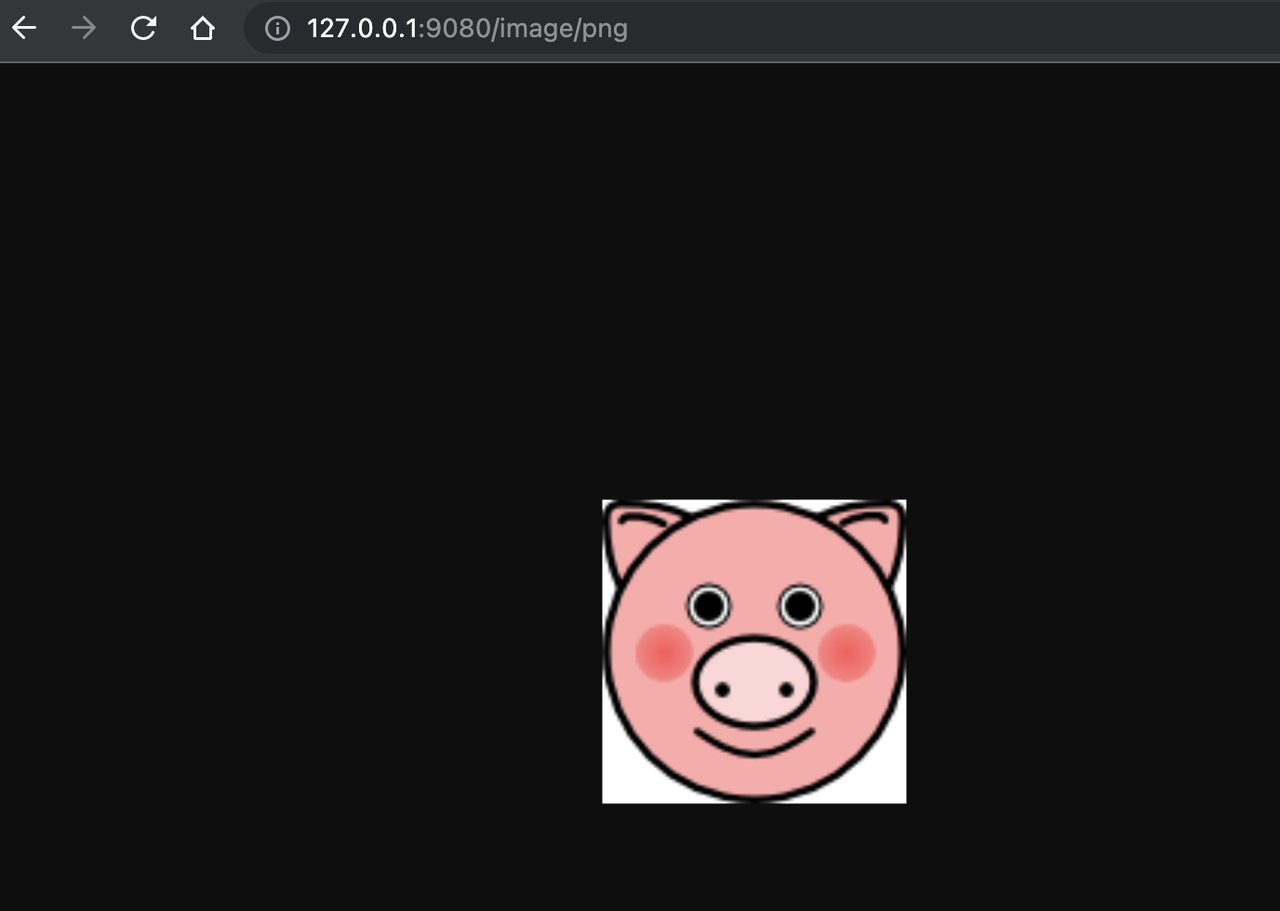
| #### Successful access | ||
|
|
||
| After a successful login, the browser will again redirect the link to http://127.0.0.1:9080/image/png and will successfully access the image content. The content is identical to that of the upstream http://httpbin.org/image/png. | ||
|
|
||
|  | ||
|
|
||
| #### Logout | ||
|
|
||
| After the test, use your browser to access "http:/127.0.0.1:9080/logout" to logout your account. | ||
|
|
||
| > Note: The logout path can be specified by `logout_path` in the OpenID-Connect plug-in configuration, the default is `logout`. | ||
|
|
||
| ## Summary | ||
|
|
||
| This article shows the procedure of using OpenID-Connect protocol and Keycloak for authentication in Apache APISIX. By integrating with Keycloak, Apache APISIX can be configured to authenticate and authenticate users and application services, which greatly reduces the development work involved. | ||
|
|
||
| For more information about the implementation of authentication in Apache APISIX with Okta, see [this article](https://apisix.apache.org/zh/blog/2021/08/16/Using-the-Apache-APISIX-OpenID-Connect-Plugin-for-Centralized-Authentication/). | ||
12 changes: 9 additions & 3 deletions
12
...docusaurus-plugin-content-blog/2021/12/07/apisix-integrate-skywalking-plugin.md
This file contains hidden or bidirectional Unicode text that may be interpreted or compiled differently than what appears below. To review, open the file in an editor that reveals hidden Unicode characters.
Learn more about bidirectional Unicode characters
6 changes: 4 additions & 2 deletions
6
...aurus-plugin-content-blog/2021/12/08/apisix-integrate-rocketmq-logger-plugin.md
This file contains hidden or bidirectional Unicode text that may be interpreted or compiled differently than what appears below. To review, open the file in an editor that reveals hidden Unicode characters.
Learn more about bidirectional Unicode characters
Oops, something went wrong.
Add this suggestion to a batch that can be applied as a single commit.
This suggestion is invalid because no changes were made to the code.
Suggestions cannot be applied while the pull request is closed.
Suggestions cannot be applied while viewing a subset of changes.
Only one suggestion per line can be applied in a batch.
Add this suggestion to a batch that can be applied as a single commit.
Applying suggestions on deleted lines is not supported.
You must change the existing code in this line in order to create a valid suggestion.
Outdated suggestions cannot be applied.
This suggestion has been applied or marked resolved.
Suggestions cannot be applied from pending reviews.
Suggestions cannot be applied on multi-line comments.
Suggestions cannot be applied while the pull request is queued to merge.
Suggestion cannot be applied right now. Please check back later.
Uh oh!
There was an error while loading. Please reload this page.